Showing posts with label Backyard Grocery Garden. Show all posts

Food Self-Sufficiency: Fruit

Fruit
Fresh fruit has essential vitamins and minerals needed for strong bones and blood cells, antioxidants, and fiber. Absolutely required for good health, yet we don't eat much as a USA nation. I read somewhere that fruit should be eaten at times when you don't eat vegetables, so that they don't compete for digestion. Whether that's true or not, because of the sugar content of most fruits, I usually serve fruit during lunch, and veggies during dinner. Fruit is also a good snack in between meals, especially when served with a protein like cheese or nuts/seeds.

= = = = = =

Here's a list of fruits with Nutritional Values, from: http://www.bellaonline.com/articles/art49478.asp - not complete by any means. I mean, where's the avocado?
 
(Concerns are in parenthesis, but if you grow them yourselves and/or limit usage, you should be ok.)
 
Apples - flavonoids, fiber, C (pesticides, wax coating) Dried, canned chunks/applesauce, canned apple butter, frozen, juice, cider, vinegar
Apricots - carotenoids, A, C, fiber (preservatives) Dried, canned jam
Bananas - B6, C, potassium (glycemic) Dried, frozen
Blackberries - flavonoids, fiber, C, K, manganese Dried, frozen, canned jam
Blueberries - flavonoids, C, manganese, fiber Dried, frozen, canned jam
Cantaloupe - carotenoids, C, A, potassium Frozen
Cherries - flavonoids (pesticides) Dried, frozen, jam, pie-filling
Cranberries - flavonoids, fiber, C, manganese Dried, frozen
Dates- (glycemic) ??
Elderberries - C, very high in antioxidants (glycemic) Dried, jam, cold/flu syrup
Figs - (preservatives) ??
Fruit juices - (glycemic)
Grapefruit - carotenoids in pink, flavonoids, C Frozen, Juice
Grapes - flavonoids, manganese (pesticides) Dried into raisins, Jelly, Frozen, Juice, Wine
Guava - carotenoids, fiber, C ??
Kiwifruit - C, fiber (glycemic) ??
Lemons - flavonoids, C (wax coating) Zest Dried, Frozen
Limes - flavonoids, C (wax coating) Zest Dried, Frozen
Mangoes - carotenoids, A, C (glycemic) Dried, ??
Melons - carotenoids, C, A, B6 (glycemic) Dried, frozen
Nectarines - carotenoids, C (glycemic, pesticides) Frozen
Oranges - carotenoids, flavonoids, C, fiber (glycemic) Canned jam?, Zest dried, juice, frozen
Papayas - carotenoids, C, folate, potassium Dried, ??
Peaches - carotenoids, C (pesticides) Dried, frozen, jam
Pears - flavonoids (pesticides) Dried, Canned as Pear-sauce, Frozen
Persimmons - C (glycemic) Dried
Pineapple - C, manganese (glycemic) Dried
Plums - carotenoids, C Dry into prunes, frozen
Raspberries - flavonoids, fiber, manganese, C Dried, canned jam, frozen
Raisins - (glycemic, pesticides, preservatives) Kept dried
Strawberries - carotenoids, flavonoids, C, fiber (pesticides) Dried, canned jam, frozen
Tangerines - carotenoids, A, C (glycemic) Canned jam?, juice, frozen
Watermelon - carotenoids, C, A, B6 (glycemic) Dried, frozen

Remember: When you eat a dehydrated/dried food, you need to drink a liquid, preferably water, to prevent constipation.
 
Plan
So ... what kinds of fruits can I realistically grow on my 10x10 patio, on the windowsill in my bathroom, and in the corner of my living room?  Here's what I HOPE to try this year in my little Backyard Grocery Garden:
-five-in-1 fruit tree
-yellow apple miniature tree
-blueberry bush (miniature)
-strawberries
 
...and if at all possible ... elderberries!!
 
 
Give it some thought ... how much space do you have to grow things, and what is the basic minimum fruit you could grow?

Is Food Self-Sufficiency Possible?

Food Self-Sufficiency has interested me for years. Is it possible to grow everything we need to eat a healthy and varied meals? What about if you only have an apartment?
Here are my thoughts:

This is the problem: We are products of modern days. A time when we could get in the car and drive 5 minutes to a fast food joint or convenience store. When we have freezers stocked with pre-made dinners, toaster waffles, and logs of ground beef. When our pantry is stocked with tin cans purchased, and not home-canned. When a quick meal means grabbing carbs and meat with little thought to fresh veggies and fruit. When we can eat an entire bag of chips or bowl of popcorn as we vegg in front of a TV. When dessert is cake or something sweet, instead of fresh fruit and homemade cheese.

What would happen if the economy got so bad that we couldn't afford to go to McDonald's or order delivery from Pizza Hut? Or Peak Oil happened so drastically that we ran out of gas? Or if the electrical grid went down from a EMP, which meant even grocery stores would be out of food within days, with no chance of restocking.

So how do make the transition to homegrown anything and everything?
I've discovered cold turkey doesn't work for me. Sometimes I have a migraine. Or my IBS is acting up. Or my autistic epileptic son MUST have his Cinnamon Life Cereal.

I just don't feel like thinking about what's in the pantry or refrigerator, or stored in jars in my closet.  I'm sure I'm not alone.

When I had my little farmette in Colorado with my husband, we had goats (milk and it's products, meat, income [sold cheese]), chickens/turkeys/quail (eggs, feathers, meat, income), rabbits (meat, income, "fur") as well fruit trees and bushes, and a large garden for veggies, fruits, herbs and greens.

We learned so much and put away a lot but honestly, we MIGHT have been able to survive for a short while on what we successfully grew.  But now? My son and I live in a small apartment in Kentucky. Yes, we have an outdoor patio, but how much can I really grow in this tiny "backyard grocery garden"? Enough to feed us if we have nothing else?

I plan to explore that in the coming posts.

Fruit Trees on your Property

If you have a spot of land, you really should have planted a fruit tree or 20 by now! Why?

  • Long term food source
  • Food for the bees to keep them around
  • Apple trees, once they die or are no longer producing, are great for firewood
There are even miniature fruit trees that you can grow inside. Look for colonnade trees at the Starks Brothers Nursery. Several different kinds of apples, and one peach that I know of.  Grow in a pot, and have it on your deck or balcony in good weather, or start an inside garden where the tree is prominently featured!

If you have even .25 of an acre, what fruit trees have you planted? What fruit tree can you just not live without?

  • Apples: so versatile, from fresh eating, long-term storing, dehydrating, juicing, canning for apple butter or pie filling, and even making vinegar for pickling, digestion and cleaning.
  • Pears: delicious fresh, dehydrating or canned. Have you tried pear raisin pies?
  • Cherries: very expensive in the store so try growing either pie/sour cherries or sweet. We love the Ranier cherries (yellow and red). If you don't want a tree, Nanking cherries grow on a bush.
  • Plums: very healthy but highly sprayed from the stores. Great to eat fresh, dehydrated or canned. I make an amazing spiced plum jam that I use for Winter holidays.
You get the idea. What fruit tree do you absolutely need on your property? And why?

Tomato Update

I had no idea what to write about today. Just sitting at the computer, thinking, making notes, and pretty much wracking (racking?) my brain. I happened to glance at the plastic shoe tub with my 6 tomato starters in it. Wonder how they're doing? It was a busy weekend, and I hadn't checked them since Friday.

Here's a pic of them on 3/6/09, when I first placed the seeds in the rehydrated Jiffy Pellets:

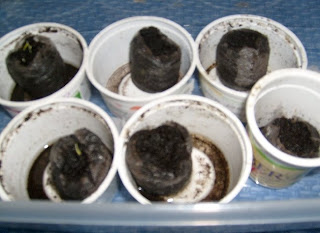
Here's a pic of them today - 3/21/09! Two have sprouted... The Amish Paste and the MoneyMaker ... two I've never grown before. The top left and bottom left are the ones that sprouted. Don't they look beautiful! I love this part.... when the itty bitty seedlings burst above the "soil's crust".
Here in the Denver area we're actually supposed to get some snow today or maybe later this week. Yeah, right. We've barely gotten any this year. So.. to make it more Spring like, I think I'll sow some more seeds, for the plants we'll leave behind when we sell the house (or we'll eat, depending on how long it takes to sell the house.) Watermelon, cantaloupe, carrots, greens, etc.

Asparagus and Strawberries for the Spring Garden

I convinced Hubby to go to my favorite nursery on Saturday. We hadn't been since Fall and I was in withdrawals. No matter that I'd already purchased several packets of seeds from my favorite online suppliers, and had already started my tomato seeds. Or that we haven't finished preparing the raised beds or containers yet. Nope, I drug (dragged?) Hubby and VHTS to Paulino's in North Denver for a look-see.

Came home with 10 asparagus roots, 25 strawberry plants, 1 blueberry bush, seeds for a eggplant specifically bred for containers, and adzuki and onion seeds for sprouting (eating as sprouts).

We decided to leave our two 8x4 raised beds for the next owners, and are hoping if we get them pretty green by June (when we put the house on the market) that people will be more apt to buy a house with a yard that's producing: asparagus, blueberries, strawberries, tomatoes, radishes, beans, greens and carrots. Hope we aren't looking at this with rose-colored glasses.

The first 8x4 raised bed, prepared to be acidic, will have:
  1. blueberry bush (already there - the only one that didn't die last year)
  2. 6 asparagus roots
  3. 20 strawberries

Last year we grew soybeans and carrots in the second 8x4 raised bed. This year we'll plant:

  1. 3 tomatoes on the north side of the bed, completely with marigolds and basil in between
  2. greens (black seeded simpson, buttercrunch, parsley, etc.)
  3. carrots (orange, red, yellow, purple and white)
  4. radishes
  5. 3-4 bush beans

In our front yard we have 3 small areas prepared where last year we grew tomatoes, soybeans, bush beans, cucumbers, squashes, pumpkins, asparagus (which have disappeared!), basil, borage, and black turtle beans. We also have (from last year) 4 roses which may or may not be alive, lots of crocuses and tulips, 2 red raspberry plants and about 15 strawberry plants that look like they survived the winter. The borage also never completely died so it might stay put.

This year we'll plant:

  1. Top area: boston pickling cucumbers to trail up the two posts from porch floor to roof
  2. Top area: already has 4 roses, which may or may not be alive, so we'll plant a few various yellow flowers there and might add a yellow-pear tomato in the middle of the row
  3. Middle area: yellow wax beans (because yellow is a good house-selling color; I don't like these beans so here's hoping the new owners do!)
  4. Middle area: a few hot pepper plants
  5. Bottom area: spaghetti squash (we think) because, again, yellow is a selling color. Planting at each end of the long 12-foot bed and will "train" to grow towards the middle. Plenty of room, and prolific. Another gift to the new owners!
Last year we used kiddie pools for our cold crops (lettuce, cauliflower, broccoli, etc), and kept under a shade tree but these pools are very heavy when full. Not practical when planning a move.

Instead... we're planting as much as we can in 5 gallon pots/containers so we can move them to our new home. We have about 30 pots so this is our plan for them:
  1. Blueberry (the new one that we bought on Saturday)
  2. Eggplant
  3. Eggplant
  4. Hot pepper
  5. Hot pepper
  6. Striata-d-Italia Zucchini
  7. Striata-d-Italia Zucchini
  8. Yellow straightneck squash
  9. Yellow straightneck squash
  10. Bell Pepper
  11. Bell Pepper
  12. Okra
  13. Okra
  14. Bunching onions
  15. Bunching onions
  16. Wonderberries
  17. Raspberry
  18. Raspberry
  19. Blackberry
  20. Blackberry
  21. Blackberry
  22. Tomato/basil/marigold
  23. Tomato/basil/marigold
  24. Tomato/basil/marigold
  25. Tomato/basil/marigold
  26. Tomato/basil/marigold
  27. Tomato/basil/marigold
  28. The rest will have as many tomatoes as possible. We're growing several varieties - but never enough!

We have other containers that still have plants alive from last year (indoor grow lights / dormancy): (1) asparagus (2) asparagus (3) blueberry (4) banana (5) wonderberries.

Ooops. Guess I got off topic. I love my garden, and as things grow, we'll post regular updates with pictures.

Growing Turnips

I don't care much for turnips but here's a bit of information for your to grow and harvest your own turnips and greens:

Description:
The turnip is a biennial which means it grows in one summer, hides a little during the winter, and flowers the next season. It's usually considered an annual, though.

The leafy stems may get 1-2 feet tall and the root (the actual turnip) could get up to a foot in diameter. (We're using the term "root" lightly as it's not an actual root but a swollen part of the stem).

Americans prefer to grow 'Purple Top White Globe' for the roots and 'Seven Top' for the turnip greens, but there are a plethora of varieties to choose from - it depends on what color and taste you prefer.

History:
The turnip has been "gardened" by humans for a long time - some say more than 4,000 years! North America discovered them in the late 1500's.

How to Grow:
Turnips can grow in almost any soil, if it isn't too hard or too wet, but should be near-neutral PH. They need full sun, and a deep watering once a week (otherwise they could bolt prematurely). Very cold tolerant, and can tolerate frost and moderate freezes (down to around 15 degrees F). These are a cool-weather crop, so plant in very early Spring (now is a good time) or in late Summer to mature in the cool Autumn.

Sow turnip seeds thickly. Cover with about 1/4 inch of soil; water well. Germination may happen in less than a week.

IF growing for roots, thin seedlings to 6 inches apart when they are 3-6 inches tall. Eat the seedlings (wash first!) in salads or steam.

Hardiness:
USDA Zones 3-10.
Grow fast and pick young because as the weather warms, the greens (tops) will get bitter and the roots (turnip) will become stringy and woody. Frost improves the flavor.

Harvest:
Greens are ready to harvest in 5-7 weeks - just take a few leaves from each plant so that it will continue to produce more leaves, and will continue to grow the turnip. Harvest roots in another 2-3 weeks. Note: if growing in the Autumn, can leave the turnip in the ground if it doesn't freezse solid.

Usage:
Eat the little seedlings raw in salads or steam like spinach with onions and served with ham.

We'll be posting how to "put up" turnips soon!

= = = =

Updated March 15 2009: If you found this blog posting through a blog carnival, we hope you'll click here and check out our recent postings, including how to raise chickens indoors, living paycheck to paycheck, how and why we have stored food recipes, and much more!

Starting Tomato Seeds

Here are a few pictures that show what we did to start our potted tomato plants yesterday (Mar 6):

We found the easiest method was peat pellets. Yes, we know that peat is not a renewable source, but until we become much better gardeners (remember that this is only our second year), we'll use what works best.

Note: Just picked up a pack of 25 peat pellets (without the little greenhouse) for $2.00 - at Wal-Mart. Not a bad deal.

So... this first picture is the "Jiffy Greenhouse 72" that we bought at the end of last season. At that time, we didn't know we'd be moving. So, since we can't plant a big garden like last year's, I just took 6 of the pellets from the "greenhouse" and placed them in a dish.

Whatever dish you use to rehydrate the pellets, make sure it is shallow enough for you to manipulate the pellets, and that all pellets fit well. Fill a container (I'm using my kitchen measuring cup) with WARM water. For some reason, cold water doesn't seem to work well. Don't flood the dish. Just pour a little at a time. Keep an eye out. I had to go back and pour some more into the dish twice, and the last time, the pellets barely took any in. The pellets, as they rehydrate, will "puff" up, becoming taller. Discard the unused water.

Note that the pellets are basically peat moss (I think), compacted, and surrounded by a netting. As they puff up, the netting holds the in place.

When they have rehydrated as much as they are going to (about 1 inch to 1.5 inches tall), gently take the top and move the netting away from the very top. I just take my two index fingers and pull the netting away from the top. Then I take the same fingers and push in the middle of the sides to fluff-up the peat. This will "un-compact" the peat even further, so when you place in the seed, it won't have to struggle to throw down roots. I tried to take a picture of me doing this but it just didn't come in very clearly.

This third picture shows the six peat pellets that have been rehydrated, and placed in yogurt cups. I'll add a little water to each cup as needed (using a mister is best).

I'm using seeds I got from Baker Heirloom: Amish Paste (new), Big Rainbow (yum - big juicy and orange!), Moneymaker (new), and Orange Banana (new) .

Then I wrote on an index card what seed will be put in each pot. We're only doing 6 tomatoes this year. Probably. Maybe change it later.

I cut the labels and taped to the yogurt cup. Then I placed one or two seeds in each pellet that corresponded with the label. I just barely moved the peat aside, placed the seed(s), then barely covered it over. If you've never seen a tomato seed, you should know that they are very small and need to be fairly close to the surface.

Then I took the pellets-in-yogurt-cups into plastic tubs and covered them to keep the moisture in. Now I'll check on them every day. Usually I check 2 or 3 times a day because I love this part!

This last picture shows a couple of our tomato pots from last year (2008). Notice that we placed a marigold and basil in each pot to help keep bad little critters/pests away. It worked very well.

NOTE: I can NOT emphasize enough that you need to label your seedlings. And keep those labels with the plants after you transplant them. We didn't do a great job of that last year and half the time, didn't know what tomatoes we were eating! I still can't tell you what tomatoes are in this last picture!

We had the same problem with our squash but that's another story.

Vikki

How to Start Seedlings for Spring Plantings

The pic to the right shows our seed starting supplies: Jiffy Peat Pellets (the "greenhouse" and those we've watered and are awaiting seeds in yogurt cups) and Peat Pots (strips) that we used last year for corn - might use again later. We'll see.

Now... to the posting!

If you live in the Northern Hemisphere, it's time to start some of your vegetable crops indoors. Here's some tips to help you.

Basic information:

Don't start seedlings too soon. They could become crowded and spindly which will hurt their survival chances when you can finally get them in the ground outdoors.

Some of your veggies (and other annuals) do best when sown directly into the ground where they'll live their lives. Better wait for those until the weather is ready.

Have you built a cold frame yet? If so, get started in that because that will give you a six-week head start!

Seedlings started indoors or in cold frames should be "weathered" or "hardened off", which means you need to gradually introduce them to the outdoors. Nights will still be cold.

Starting Seed Indoors:

Start start seeds four to eight weeks before the average date of last killing frost. Don't do it too soon or the seedlings will be thin and spindly and won't do well outside.

We started our tomato plants yesterday (March 6) here in Colorado but since they'll be grown in pots because of our moving situation, we can bring them in if we ever actually get cold weather. Ha!

= = = =

PEAT PELLETS: We use the Peat Pellet system - we'll post an entry about this later today. Yes, we realize peat is a non-renewable source, but we're still somewhat beginner gardeners, and are still working with alternatives to find what's best for us.

PEAT POTS: Again, non-renewable, but these little pots work well with transplanting. Fill the little pots with potting soil, place in a dish or something to catch the water, lightly moisten the soil, add a seed, label (!!!), and watch. Moisten regularly. When seedling comes out of soil, place in sun. When seedling is as big as the pot, ready to transplant! This is what we do for corn seeds, as it doesn't disturb the root when transplanting.

YOGURT CONTAINERS: Almost any container with drainage holes in the bottom will work for planting. Paper milk cartons cut in half, Styrofoam cups, tin cans, yogurt containers, plastic trays and pots are common containers used. Again, fill with potting soil. Avoid using your garden's soil unless you've composted well, and you're sure the soil doesn't have weed seeds or anything else that can interfere with the maturation of your veggie/fruit/herb seed.

= = =

TIP: Don't fill your pot or container to the top with potting soil. Remember, you need to keep the seed moist, so when you water, you want to make sure the water doesn't run off, taking some precious potting soil with it. Using a mister is best.

TIP: Place seeds in the potting soil according to the seed's directions. Good rule of thumb is the size of the seed is exactly the amount of depth you should plant it - cover no more than four-times the diameter of the seed. For instance, lettuce and other greens seeds are very very small so place the seed on top of the soil and just VERY lightly, dust potting soil on it.

TIP: Most places say "place two or three seeds in each pot" but when every one counts, I just place one seed. That way, I don't have to thin. I'd rather re-seed than thin, any day. Well, except for huge crops like corn.

TIP: Remember to water carefully and often. The seed needs to be constantly moist to germinate, and using small pots or pellets will dry out rather quickly. Check at least daily - when first starting I usually check at least twice a day because I'm constantly looking to see if we have any babies! HOWEVER, don't soak the soil because that could rot the seed. It's a fine line.

TIP: Cover the containers or peat pellets with something thin (like plastic wrap or plastic covers or panes of glass). The "greenhouse" in the pic above already comes with a plastic cover. Place in a cool room (60 to 65 degrees) away from direct sunlight until you see a seedling pop out (called "germination"). Once you see seedlings, move them over two or three days into brighter light. Once the seedlings have developed the first true leaves (the leaves above the cotyledons or “seed leaves”), thin to one plant per container if using partitioned trays or peat pots. Use scissors or tweezers to cut or pinch off unwanted seedlings (pulling them will disturb the remaining seedling).

TIP: Ready to transplant? About one week prior to planting-out time (remember to use your freeze-date guidelines), gradually expose your seedlings to longer and longer time outdoors, except when temperatures are going to dip below 50 degrees. While exposing them to the outdoors, reduce watering to a minimum but don't let the seedlings wilt. Being careful with the seedlings at this point will help the bigger seedlings/plants adjust to full outdoor exposure without a lot of shock when you transplant them.

That's it for now. Have you bought your seeds and potting medium yet? For some of us, it's time to get started!

Gardening To-Do-List for March

March:
  • Make second plantings of such quickly-maturing crops as turnips, mustard, radishes and "spring onions."
  • Thin plants when they are 2 to 3 inches tall to give the plants room to grow. Use scissors to cut the plants out to disturb the roots as little as possible(Although.. many people are of the mind that you don't over-plant so you don't need to thin.)
  • Carry out any February jobs not completed.
  • Treat seed before planting or buy treated seed for protection against seed-borne diseases, seed decay, seedling "damping off" and soil insects such as seed-corn maggots.
  • Early-planted crops may need a nitrogen side-dressing, particularly if the soil is cool. Place the fertilizer several inches to the side of the plants and water it in. A little fertilizer throughout the growing period is better than too much at one time.
  • Before settling them in the garden, harden-off transplants. That means placing them in their containers outdoors in a sheltered place a few days ahead of planting them.
  • Get rows ready for "warm-season" vegetables to be planted during the last week of March or first week or two of April as weather permits. That's if you'll be doing row crops. If you're doing square foot gardening, just check your soil, add more compost, and warm it up.
  • You might want to risk planting out a few of the more tender crops and keeping them covered during bad weather.
  • Watch out for insects, especially cutworms, plant lice (aphids) and red spider mites.
  • Put down mulch between rows to control weeds. Trust me, if you don't get the weeds early, you will have a VERY hard time later. Will become overwhelming.

QUESTION: Gardening for Survival - What would you REQUIRE?

If you could take only five seeds or plants on a deserted island, what would you take? What could you absolutely not live without?

Leave your answer as a comment to this post.

Some suggestions:
artichoke
asparagus
beans
beets
berries
broccoli
cabbage
carrots
cauliflower
celery
corn
cotton
cucumbers
eggplant
garlic
grains
greens
melons
okra
onions
peanuts
peppers (bell and hot)
potato (baking and sweet)
radishes
rhubarb
soybeans
spinach
squash, summer
squash, winter (incl pumpkins, butternut, etc.)
sunflowers
tomatoes (several varieties)
= = = =
trees like almonds, walnuts, pecans, filberts, apples, pears, apricots, cherries, pinion pine, etc.
= = = =
herbs like soapwort, basil, chives, tarragon, oregano, borage, sage, motherwort, cilantro, parsley, thyme, dill, echinacea, etc.
= = = =
bushes like elderberries, bayberry (wax), raspberries, blackberries, holly, etc.


We've been wanting to ask this question for a while - for people who have limited gardening space, this would be a great post to read.

Personally, I'd have (1) corn (2) almond tree (3) beans (4) squash like zucchini and (5) apple tree

Gardening To-Do-List for January and February

January (yes, it's a little late):
  • Make a garden plan. Plan the garden to include various vitamin groups, and space. And patience!
  • If you've had a garden before, consider planting a few new varieties along with the old favorites. Especially concentrate on heirloom seeds so you can save seeds in the Fall for next year's garden.
  • Plan the amount of each vegetable to be planted, including enough to can and freeze. Rule of thumb is to allow about 1/10 acre of garden space for each member of the family. If you don't have that much space, just do what you can.
  • Buy enough quality (heirloom) seed for two or three plantings to lengthen the season of production. Especially carrots, radishes, and lettuce.
  • Take soil samples if you have not already done so, and take them to your county extension office for analysis.
  • Apply manure or compost and plow it under if you did not do this in the fall.
  • Apply lime, sulfur and fertilizer according to the soil-test results and vegetable requirements. Buy 100 pounds of fertilizer for each 1/10 acre to be planted (if manure is not available, buy at least half again more). Use 5-10-10 or 6-12-12 analysis, depending on soil test and vegetable requirements.
  • Get plant beds or seed boxes ready for growing plants such as tomato, pepper and eggplant. Have beds ready for planting in February.
  • Check on your compost pile and make sure it is ready for use in the spring.
  • Get copies of gardening publications for your area.

February:

  • Start seeds (using jiffy pellets, peat pots, etc.). Peppers and eggplants will take eight weeks to grow from seed to transplant size, while tomatoes will take six weeks. When the seedlings form their third set of true leaves, transplant them to individual containers. Best to transplant directly to peat pots so when you put them into the ground or raised beds, there will be very little root disturbance.
  • Prepare land for planting. Make sure you've put together raised beds (with wood, old plastic kiddie pools, etc.. It's especially good for Winter and early Spring plantings to be in raised beds because the soil will warm up faster, and have better drainage.
  • If nematodes were a problem last year, make plans to plant another crop less susceptible to nematodes in the infected area. Actually, rotating crops is something you absolutely need to do!
  • Make early plantings of your choice from the following: carrots, collards, lettuce, mustard, English peas, Irish potatoes, radishes, spinach and turnips. If you have a protected area, or cold frame, these can go directly into the ground.
  • Use "starter" fertilizer solution around transplanted crops such as cabbage.
  • Replenish the mulch on strawberries. Remember, Winter isn't over yet.
  • Start peat pots, etc. for herbs, to be ready for planting in April. Make a list of the ones that are best to buy rather than seed, such as French tarragon and rosemary.

What is a BYG-Garden?

Does anyone remember what a Victory Garden used to be? From: http://en.wikipedia.org/wiki/Victory_garden: Victory gardens, also called war gardens or food gardens for defense, were vegetable, fruit and herb gardens planted at private residences in the United States, Canada, United Kingdom and Australia[1] during World War I and World War II to reduce the pressure on the public food supply brought on by the war effort. In addition to indirectly aiding the war effort these gardens were also considered a civil "morale booster" — in that gardeners could feel empowered by their contribution of labor and rewarded by the produce grown. Making victory gardens became a part of daily life on the home front.

These days, the PBS show "Victory Garden" website says: http://www.pbs.org/wgbh/victorygarden/show/index.html - With so many Americans aspiring to care for the environment and create their own outdoor living spaces, The Victory Garden's unique fusion of garden design, earth-to-table cooking, and eco-conscious how-to tips is of greater interest today than ever before in its more than 30-year history. I've tried watching the show and it very rarely discusses edible plants. Can I just say.... why doesn't it actually tell us more about how to best garden in our yards like what a Victory Garden is supposed to be?

We don't need Victory Gardens - like this "war" is what's really the only thing affecting the prices of our food. Nope. So, since part of the reason of this blog is to help people be more self-sufficient and independent, we decided to re-name the Victory Garden to the BYG-Garden (Back-Yard Grocery Garden). We're working to figure out how to provide all of our needs on just an acre or two.... from toiletries to veggies to protein to medicines to ... well, your suggestions would go a long way.

To have a Backyard Grocery, you don't really need a backyard. You can do a little in just a corner of your living room. That will definitely help. Or a friend's yard. Or community garden.

Come join the fun! We're working on our BYG - are you?

Gardening: Grow Potatoes in Tire Towers

The picture to the right
was taken in Summer 2008.

See the bushy-ness in the two 3-tire towers? (That bushy plant towards the back is a rhubarb.) Potatoes are relatively easy to plant, and growing them in tire towers takes a lot less room than hilling rows. The other tires were later used for additional tiers, and a couple were moved for the pumpkin patch. But that's another posting!

Here's how to do the potato tire towers:
  • Drop by your local tire repair place (like Big-O Tire) and ask if you can have some of the tires they are throwing out. Be sure to wear gloves, and get some tires that have NOT used fix-a-flat or don't have steel edges showing. VERY important.
  • Pick a location that will give your potatoes lots of full sun. This section of the fence got about 8-10 hours of full sun.
  • Loosen the top layer of the ground, OR if your soil is as bad as ours, cover the ground with mulch-fabric, or cardboard & newspapers.
  • Lay one tire on top of your prepared area (we did one tire for russet potatoes - left, and one tire for red potatoes - right).
  • Line the inside of the tire with newspaper or plastic.
  • Fill entire tire with topsoil or potting soil.
  • Take 4 seed potatoes (per tire tower) and place them 2 inches down into the soil. Water.
    Watch your potato plants. When they are about 8 more inches about the soil, add another tire, and fill it, leaving a couple of inches sticking out. We had to place enough potting soil to fill only half the tire. When the plant grew a few more inches, we added more soil. Water regularly.
  • Continue with the next tire. And a fourth. Remember to leave some of the foliage out of the soil to allow it to catch more rays. Don't go any higher than 4 tires.
  • Dig out 2-3 weeks after the potato plant has flowered. UNLESS you want more matured potatoes... then you wait until the foliage is dead then dig them up. You can do a tire at a time, if you'd like.

Very easy and a good way to conserve space.

Gardening: Wonderberries (aka Sunberries)

Wonderberries. They are also called garden huckleberries & sunberries. They are a small shrub and not as picky as tomatoes. Gotta remember to NOT eat the green berries (possibly poisonous!). Eat when blue - cook with sugar like in a pie. Here's a good reference: http://www.tradewindsfruit.com/wonderberry.htm.


We'd gotten the seeds from Baker Heirloom (http://www.rareseeds.com/). I'd planted the seeds in a cup, and when they got about 2 inches tall, transplanted into a planter and placed outside near our strawberries. I hate to say this, but except for watering (sprinkler), I forgot about them. It grew into a very small bush, about a foot high. When it got cold and we started bringing in the plants (October), we brought that in. As we were figuring out where to place it, Hubby noticed the bush had a lot of dark blue berries on it! Guess we missed the unripe/green stage. We were quite brave, and each tasted one. Yum! They are quite sweet, like a blueberry, but much smaller. They have a good Winter home in our family room, under the grow light, with the tomatoes, banana tree, and blueberry bushes.


We can't find any nutrition data on them, but we're somewhat confident they are similar to other berries in nutrition, antioxidants, probably vitamin C. Now that we've experimented with the seeds, and like the taste, we plan to have a LOT of wonderberry bushes next year. Planning on a huge crop of these okay-to-ignore berry bushes.


We have only the one plant this year so no experimenting with processing and preserving, but next year, we'll try to dehydrate, make jam, and freeze. Anyone have experience and/or knowledge of wonderberries?

Gardening Seed Order to Baker Heirloom

Here's our order to our favorite seed store (Baker Heirloom: http://www.rareseeds.com/):

Summer Squash:
Many of these are also used for winter too! The species is C. pepo.. 20 seeds + per packet. Summer Squash are grown for immature fruits which can be harvested all summer long. Very heavy feeders, they need soil heavily amended with manure, compost, or other source of lots of nutrients. Sow in place in full sun after last frost; or start a couple weeks earlier indoors, but never let squash transplants become rootbound, and do not disturb the roots in transplanting. Seed are sown up to one inch deep. With the exception of Zucchino Rampicante, summer squash are bush-type (non-running) plants that may be grown 4-5 feet apart.

Crookneck - Early Golden Summer 50 days. An old favorite heirloom, this is one of the oldest types of squash dating back to pre-Columbus times and has been popular ever since. Easy to grow and good tasting. NOTE: We grew straightneck in 2008 but Hubby wants crookneck this year. $1.50/pack.

Striata d'Italia 50 days. Medium-long zucchini fruit, somewhat thicker at the blossom end, light ribbing, 8-9" long. The skin is striped in light & dark green. Superb flavor and texture, this variety is popular in Italy for its flavor & early yield. NOTE: We grew these in 2008 and didn't plant nearly enough seeds (only 2). We want at least 10 in 2009! $2.00

Winter Squash and Pumpkins:
20-35 seeds per packet. Grow winter squash in very rich soil, amended with manure, compost, or other rich source of plant nutrients. Plant in rows, 5-8 feet in both directions, sowing one seed every 6-12 inches. Or plant in hills, 5 seeds per hill, with the hills 6-8 feet apart, thinning to best three plants. Full sun, ample moisture and insect control as necessary should allow good production from the vigorous plants. Harvest in autumn when skins are too tough to be easily punctured with a thumbnail.

Butternut - Waltham 100 days. (C. moschata) An old favorite, good yields with excellent tasting, rich orange colored flesh. Great baked! NOTE: We grew these in 2008 but started them too late so only 2 squash got big and hard enough to store. These taste a lot like sweet potatoes, especially when backed into a pie. $2.00/pack.

Connecticut Field 100 days. (C. pepo) The heirloom pumpkin of the New England settlers and Indians, several hundred years old, golden fruit weigh about 20 lbs each. This is a truly old variety, can be used for pies, the traditional American pumpkin. NOTE: This is the pumpkin that we usually see for sale in groceries, etc. around Thanksgiving. Good for roasting seeds and pumpkin flesh for eating/pies. $2.00/pack

We planted way too many squashes in 2008 and they ended up cross-pollinating. So, although we'd like to plant Mexican Xtop again, or Table Bush Queen , or Vegetable Spaghetti , we'll have to wait and see.

Greens:
An Old World crop that requires cooler temperatures to grow really well. In hot climates, sow spring and fall crops. In cooler climates lettuce may be grown straight through the summer, as well as spring and fall. Rich, moist soil is necessary. Plants may benefit from a few hours of afternoon shade in hottest summer weather, full sun at other times. Succession plant from earliest spring until very late summer. Leaf and heading types all need the same conditions, but leaf lettuce is easiest to grow, as are Romaine and Butterhead types. Sow seed on soil surface and rake in lightly or otherwise barely cover, but not too deeply. Do not allow seedbed to get really dry. Thin gradually, enjoying the thinnings in an early salad or two. 700 seeds per pack.

Henderson's Black-Seeded Simpson 60 days. Introduced in the 1870's by Peter Henderson & Co. Sweet and tender leaves, light yellow-green, very popular. NOTE: We grew this last year, and it gave and gave and gave. Wonderful delicious leaves. $1.75/pack.

May Queen 60 days. Early maturing butterhead lettuce for the earliest spring plantings. Pale green heads are tinged with red, and the sweet, pale yellow hearts have a pink blush to them. A wonderful 19th century heirloom. $2.00/pack.

Tomatoes:
Tomatoes can be grown simply enough by the backyard grower. Start from seed indoors 4-8 weeks prior to the last frost of spring. Seeds are surface-sown or covered only slightly to allow light which sometimes assists germination. Do not allow the soil to dry out. Containers are held in warm conditions until sprouts appear, which may take anywhere from 3-10 days, depending on temperature, moisture, etc. Move sprouting plantings immediately to bright light conditions, such as a south-facing window or under a grow-light setup. Inadequate light is a frequent cause of failure of young seedlings. At about the time of last frost, set out seedlings into rich, moist soil, well amended with compost, manure, or other good organic soil amendment. Set the plants more deeply than they grew in their pots, removing any leaves that would then be below soil level. Most indoor seedlings are too leggy despite best efforts, and the extra stem becomes an active part of the root system. Mulch to keep water from splashing from the soil onto the leaves, which is thought to spread blight. Most heirloom tomato plants get pretty large under good conditions, and should be staked to avoid sprawling over the mulch. Fruit laying on the surface is apt to rot, even on a well-draining mulch like coarse straw. Mulch also keeps soil temperature and moisture conditions more constant. Judging ripeness is largely a matter of watching for a color change, or a softening of the fruit. A few heirloom varieties don't get quite so large. Called "determinate" varieties, these get to a certain size and then set all their fruit more or less at once. Determinates may be a better choice where tomatoes are grown in a very small garden, or in containers, or where a large crop is desired all at once, like for canning. Tomato seed may be easily saved and grown another year. Most tomatoes (so-called "regular leaf" types) are self pollinating, and it is very difficult for the flower to be pollinated by any other flower. These types need only be separated by 10-15 feet to breed true in most conditions. The major exception is the "potato leaf" varieties such as the Brandywines. Due to differences in flower structure, these are more prone to crossing by insects; isolation of 50 to 500 feet is recommended.

Amish Paste 80 days. RED. Many seeds savers believe this is the ultimate paste tomato. Giant, blocky Roma-type tomatoes have delicious red flesh that is perfect for paste and canning. World class flavor and comes from an Amish community in Wisconsin. NOTE: Although some people say this doesn't have much of a flavor, it doesn't matter to us. We'll use this one to can for spaghetti/pizza sauce and ketchup. We will sow probably 15 of these because we use a lot of these sauces during the year. $2.00/pack.

Moneymaker 75-80 days. RED. An old English heirloom; greenhouse variety; produces 4-6 oz globes that are intensely red, smooth and of very high quality. This variety grows well in hot humid climates and greenhouses, sets in most any weather. Flavorful and becoming rare. NOTE: We love slicer tomatoes, and eating a BLT on homemade bread with homegrown lettuce and tomato is beyond heaven. $1.50/pack.

Yellow Pear 78 days. YELLOW. Very sweet, 1 1/2" yellow, pear-shaped fruit have a mild flavor, and are great for fresh eating or for making tomato preserves. Very productive plants are easy to grow. NOTE: Hubby LOVES these. $2.00/pack.

Orange Banana 80-85 days. ORANGE. Unique, orange, banana-shaped paste tomatoes. These tomatoes are bursting with fruity sweetness. Perfect for drying, canning and paste. Also delicious fresh and great for specialty markets. NOTE: These are firm paste tomatoes with a sweeter taste than romas. Makes for an odd but beautiful spaghetti sauce! $2.00/pack.

Big Rainbow 80-102 days. ORANGE/STRIPED. Huge fruit up to 2 lbs.; delicious and sweet tasting. These tomatoes are very striking sliced, as the yellow fruit have neon red streaking though the flesh. An heirloom preserved by members of Seed Savers Exchange. NOTE: We grew this in 2008 and it was the most delicious sweet orange slicer tomato we had ever tasted. Hubby and I split each one equally because we loved these so much. $2.25/pack.

Carrots:
800 seeds per packet. Most of our varieties mature around 65-70 days from sowing. Early sowings can be made 2-3 weeks before spring’s last frost date. The tiny seeds should be surface-sown and not covered, or covered only minimally, and kept uniformly moist until seedlings are strong. May be sown throughout spring and summer at 2-3 week intervals, until about a month before first frost in autumn. Deep, mellow, well-worked soil suits long types; half-longs and round types are better bets in heavier soils. // We love growing carrots - indoor and out, and do just fine in containers. 2008, our first year of gardening, we only grew about 100 carrots (testing, I guess). No where near enough. The atomic red and cosmic purple were odd and delicious. VHTS loved the red carrots and could never get enough. This year we're trying the yellow and this version of white as well as the little orange ones. We'll have a rainbow!

Amarillo 75 days. Lovely, lemon-yellow roots have sweet, bright yellow flesh. Good for a summer to fall crop, large 8" roots and strong tops. $3.00/pack

Atomic Red 75 days. Brilliant red carrots are so healthful and unique-looking, sure to add color to your garden. The 8" roots are high in lycopene, which has been shown in studies to help prevent several types of cancer. Crisp roots are at their best when cooked, and this helps to make the lycopene more usable. Very flavorful. $3.00/pack

Cosmic Purple This one is causing excitement at farmers' markets. Carrots have bright purple skin and flesh that comes in shades of yellow and orange. Spicy and sweet-tasting roots are great for marketing. $3.00/pack

Little Finger A superb baby-type carrot with deep orange color; developed in France for canning and pickling. Sweet 3" carrots are great for snacks. $1.50/pack

Lunar White 75 days. Here is a vigorous producer that has creamy white roots that are very mild, delicious, and have a fine flavor; very small core. White carrots were grown in the Middle Ages, but now they have become very rare. $3.00/pack


It took less than one week to get our order in the mail. And they changed the way they packaged the seeds. Still could use improvement, but much better.

Very helpful people, there. But we're not done ordering. We still have to discuss radishes, cucumbers, herbs, etc. Gotta watch the money, though!

The Sept 3 Harvest by Novice Gardeners

Here's another picture
of what we grew in our
first-year garden. We
picked this past
September 3 2008
from our little
backyard grocery.


At the top are three white scallop squash. Obviously the two smaller are the ideal size - we didn't notice the bigger until too late. However, after our first free in October, we found an even bigger one that we'd missed. Not very tasty, even baked. No, these are best harvested a couple of inches in size, and eaten raw.


Then there are our carrots - we planted so many different kinds that we're not sure what these were. Very sweet and tasty. Washed the dirt off and ate raw. Freshly harvested carrots don't last in our house very long. We planted and harvested atomic red, cosmic purple, orange Danvers 126 half long, and a cremey white carrot that we can't remember details about. We plan on sowing seeds for red, orange, purple, yellow and white carrots in 2009 - lots of each.


The one long cucumber in the picture is a Boston Pickling. The big tomato is a Big Striped Rainbow (slicer - sweet), and there's a lot of other various tomatoes in the colander. The odd-shaped yellow squash was a result of cross-pollination, but dehydrated well.


We love talking about our garden - even if all the plants are dead and the harvests are preserved now. Don't you?

Gardening: Kitchen Composting

What is Composting? It's when one-living things (plants, eggshells, leaves, grass, etc.) decompose to make "healthy dirt" - full of minerals and good things to make plants grow when added to soil. It's also a way to help save the earth: recycle yard and kitchen waste, and reduce what gets put to the curb to taken to landfills. Very necessary when doing container gardening, lasagna gardening, square foot gardening, and more.

What should be Composted? Here's a good alphabetized list:
-Aquarium Plants
-Bird cage or other vegetarian pet wastes
-Bread, stale
-Burned oats, rice, bread, etc.
-Cardboard & cereal boxes (shredded)
-Cereal and chips, stale or soggy
-Coconut fiber
-Coffee grounds
-Corncobs (chop to help decompose)
-Cotton and Cotton Swabs (no plastic)
-Dead bees, flies, mosquitoes, etc.
-Dried flower heads/leftovers from prunings
-Egg shells (rinse)
-Feathers
-Fruit peelings
-Gelatin
-Glue, Elmer’s
-Grass clippings
-Hair, pet or human
-Houseplants, dead
-Kitchen waste: old salad, cheese, greens, fruit, veggies, bread, rice, pasta, etc.
-Leaves
-Lint from dryer, behind refrigerator
-Liquid from canned fruits/veggies, old wine, old beer
-Matches (paper or wood)
-Moss
-Nail clippings (fingernail, toenail, dog nails, etc.)
-Newspapers, shredded
-Nut shells (no salty ones)
-Onion and garlic skins
-Outdated spices or herbs
-Paper napkins, notes, towels, junk mail, tissues, receipts, paper bags
-Pasta, old
-Pencil Shavings
-Pickles
-Pine needles
-Pits, olive/date/cherry/etc
-Popcorn (unpopped or popped)
-Potato peelings or stale potato chips
-Razor trimmings (beard, mustache)
-Rotted vegetables, fruits
-Shells (shrimp, crab, lobster, etc.)
-Soil, from the yardStraw, hay, wheat, bark
-Sweepings: Whatever you sweet or dust-mop up or vacuum up
-Tea bags, used
-Toothpicks
-Vegetable peelings
-Watermelon rinds
-Wood chips, ashes, saw-dust

Can Composting be done Inside? Yep. Not everybody has a backyard to compost. No problem... there are other ways to compost in even just your kitchen! We took a plastic gallon milk (or water!) jug, and cut a hole near the top, opposite side of the handle. Place in the fridge. Add things from list above. Then we have two small sealable trash cans just outside our kitchen door that we add potting soil, our scraps from the fridge-jug, and worms when we can find them. Mix it around every 60 days or so. Add to indoor planters after it's become dirt!

There are also actual countertop or other kitchen composters you can buy. Here's a few links:
- http://www.cnet.com/8301-13553_1-9881204-32.html
- http://www.cleanairgardening.com/kitchen.html
- http://www.gardeners.com/Kitchen-Compost-Crock/13006,default,pd.html
- http://www.gaiam.com/product/id/1006630.do?gcid=S18376x028&keyword=compost%20bucket

Happy Composting!

Growing The "Three Sisters": Corn, Squash, Beans

Have you heard about the "Three Sisters" method of planting corn, beans and squash?


From ( http://www.reneesgarden.com/articles/3sisters.html ): The Iroquois believe corn, beans and squash are precious gifts from the Great Spirit, each watched over by one of three sisters spirits, called the De-o-ha-ko, or “Our Sustainers". The planting season is marked by ceremonies to honor them, and a festival commemorates the first harvest of “green” corn on the cob.
Native American People used corn as the staple in their diet. Parched corn plus prevented starvation for many days. Corn was boiled, roasted and also ground and used as flour for many dishes. Corn was easy to store by braiding the leaves and hanging upside down from rafters. Husks for used as dolls, masks and mats. Corn stalks could be used as fuel. Keep a watch on the corn, and soon after you see the silks and pollen (which gets everywhere!), watch for the cobs. After a while you'll get the hang of seeing the brown silk tassles, and the feel of the cobs, you'll know when to harvest.


Pumpkins (or other winter squash) provide the ground cover. The pumpkins from even a couple of centuries ago weren't our jack-o-lantern but more of a crookneck. Pumpkins could be stewed or dried to use during the coming winter. Not sure if the seeds were roasted, or just kept for planting the next year.


Fresh young beans were cooked in stews, while the dried beans provided meals later - rehydrated for soups and stews, or ground into flour. Great source of protein when meat was scarced. The vines were braided together and also hung from the rafters. Pole beans, chosen appropriately, will use the corn stalks as a trellis without strangling the stalk. Planting the corn with plenty of room in between will help you find the beans. Once they start flowers, keep careful watch. They will quickly become edible size and ready for eating as cooked "green beans". If you plan to dry the beans, leave them alone until harvesting the corn, to dry on the vine. Still, keep a watch on them so that predators don't steal them or they don't split once they've dried.


Sunflowers have recently been found to do excellently in this arena. They break down the earth with their strong roots, and stretch out to provide a living trellis for the beans. The sunflowers are harvested when the back of the heads turn brown and bend from the weight of the seeds. Cut the stalk near the ground, hang upside down, with paper bags around the head to catch the seeds as they dry. Good for snacks, but also good for grinding into flour, and making sunflower seed oil.


Why companions? The squash/pumpkin provides ground cover to keep moisture in, and the prickles of the leaves and vines prevent predators (like raccoons) from getting to the corn. The corn provides stalks for the beans to climb. The beans fix nitrogen into the soil, which the corn needs. Together, this is companion planting at it's best. PLUS, when you mix corn, squash and beans in your diet, they make a complete protein. Also called succotash, which we don't like, but we do make our own various recipes even tastier!


Picture: Our Three Sisters
Corn-Patch on August 20 2008


As novice gardeners, we tried the "Three Sisters" in Summer 2008. This year we planted "Early and Often Sweet Corn", several different kinds of beans, and several squashes, including pumpkins, Mexican X-Top, zucchini, and yellow crookneck, plus some sunflowers and cucumbers. We tried to follow the "Square Foot Gardening" method but having difficulty finding how to plant using the Three Sisters, we guessed. BOY, we were WRONG!
  • We planted the corn seeds too close together.
  • We didn't plant enough sunflowers.
  • We planted too many kinds of corn, and they all intermingled, which was ok with us, but the different heights and maturation rate gave us problems.
  • We planted too many kinds of beans. At the end, we froze all of them because we couldn't remember what was good to dry and what was good fresh-eating.
  • We planted way too many kinds of squashes and cucumbers and etc. They all cross-pollinated, and came out very strange. Mutants. Plus, some of our choices (zucchini and yellow straightneck) were bush kinds which grew up to push aside the corn stalks, making them weak.
  • We didn't mulch and keep up with the weeds. Thus, by the end of August, we couldn't keep up and the weeds (bind-weed in our case), strangled all of the plants. We would have had a much better harvest if we'd kept up with the weeding.

So, here's what you need to do:

  • Start corn in peat pots, one corn seed per. When the seedlings are an inch high (you'll notice a long taproot starting), plant entire peat pot in corn bed. One corn per square foot.
  • Two rows of corn, about 10 feet long. Then 4-5 feet before starting another 2 rows of corn, 10 feet long. And again. The 4-5 feet in between gives you room to pick your beans, check the corn and squashes, and pull weeds without getting a corn stalk hitting your heiny.
  • Same with sunflowers - make sure they get the northern side of ALL the cornbeds because if you get the mammoth sunflowers, they will block out sunlight for everything else. These need 3 square feet for each flower as their roots are quite strong, and their stalks and leaves and faces need more room up top.
  • A week after planting the corn and sunflowers, start seeds indoors (in peat pots) for pumpkin (or your chosen vining squash).
  • When corn is at least one foot high (prefer two feet high to give them a good head start), plant entire peat pots of squashes - one per TWO corn plants and one per TWO sunflowers. Your squash seedlings should be a few inches tall by now.
  • At the same time, sow three bean seeds per corn or two per sunflower - make a triangle around the corn/sunflower. They will quickly grow up and around the stalks.

Our plan for next year: we've chosen:

  • Black Aztec Corn (heirloom - not hybrid) (sweet when ripe, and black when dried, perfect for flour) ORDERED
  • Connecticut Field Pumpkin (heirloom - not hybrid) (perfect for making pies and canning puree, and this is the pumpkin we see for sale in October for Jack-o-Lanterns) ORDERED
  • Missouri Wonder Pole Bean (heirloom - not hybrid) (old-time cornfield type - loves winding around the corn stalk and won't strangle it - good for string beans and for drying) NOT YET ORDERED

We have ordered Sonoran Gold Bush Tepary Beans (low on gas-producing, high in protein, don't need much water, excellent fresh or dried for storage) but as you can tell from the name, they are a bush bean. We'll grow the tepary, soybeans, anasazi, black turtle and other beans elsewhere.

As to the squash choice... in the following years, we'll replace the pumpkin (year 1) with Mexican X-Top Cushaw Squash (year 2), Butternut Squash (year 3) and Spaghetti Squash (year 4). Then we'll start the rotation all over again. This will prevent cross-pollination, and give us a variety. When each squash is harvested, half of the harvest will be put into cold storage, and the other half will be sliced and dehydrated (saving some seeds for toasting and some for planting in the next appropriate year).

You absolutely should try planting the "Three Sisters". It's companion planting at it's finest.

Gardening: Growing Pumpkins For Food and Fun

Pumpkins are just a winter squash, best known for providing food to early Pilgrim settlers, for pumpkin pies at Thanksgiving, as a carriage for beloved Cinderella, and for making Jack-o-Lanterns for Halloween.

Pumpkins will cross-pollinate with other winter squashes. You may get a weird product the first year, but, if you're saving the seeds, you have will definitely have an unpredictable result next year. Better to plant only one type of winter squash, and perhaps a neighbor down the block another and so on - then share the results! If you don't care about cross-pollination, buy new seeds every year and grow as much as you want.


Ask yourself what you want out of the pumpkin:
  • food (pumpkin pies and turnovers, etc, plus nutritious seeds for roasting)
  • ground cover for your corn patch
  • fun (jack-o-lanterns for Halloween or huge pumpkins to win contests)

Then take a look at the many kinds available. Choose one (or two) to satisfy your most urgent needs then figure out if it will work where you live. They are a long season crop, but with a little help, can do ok in Zones 3 or 4 and above.

  • Sugar Pie Pumpkins: Among the best for baking due to their high sugar content and smooth, even textured flesh. Not a lot of seeds.
  • Connecticut Field pumpkin is known as being best for Jack O'Lanterns. They have a classic shape and are usually what we find in the store. Grow between 10 and 20 pounds each (sometimes larger) with a bright orange color. Kinda plain tasting or sweet. Some consider this puree too watery for a pie. Good for seeds.
  • For looks and fun, check out the Baby Boo (white), Munchkin, Spooktacular, Big Max (giant), Cinderella, Lumina, Atlantic Giant (giant), and many others. Ranges from size to color to taste.

Pumpkins needs lots of room to sprawl and crawl along, with about 6 hours of sunlight a day. If your growing season is less than 150 frost-free days, start the seeds indoors in transplantable peat pots, then transfer into garden when weather warms. Or seeds can be sown directly into the garden when Spring rains have tapered off and days reach into low 70's regularly. Most pumpkins need at least 110 to 140 frost-free days. It depends on variety, daylight hours and climate.

If planting as part of the "Three Sisters", plant one pumpkin for every 1-2 corn seedling. This will provide ground cover, keeping moisture in the dirt while the prickly leaves and stems hinder critters like raccoons from stealing the corn.

Otherwise, plant 4-5 seeds, 6-8 inches apart, in a circle on a small hill (about 2-3 feet diameter), surrounded by a little moat to soak in the water, but prevents the seeds from getting water-logged. Cover the seeds with about an inch of soil to prevent the birds from finding them. Water enough to get dirt like a soaked sponge. Be gentle to avoid washing away the seed, or disturbing the little root hairs as they grow. Sprouts will appear 7-14 days. After another week, thin to 2-3 healthy plants per hill (we use scissors so that pulling a seedling won't disturb the others' roots).
These are vigorous growers, with vines sometimes 30+ feet long, and several offshoots. When growing giants, pick the biggest couple of fruits, and clip off the rest. For others, allow them to grow as they will. Don't baby them though (moving too much - better to prune to gently guide them where you'd prefer they grow).

Pumpkins are heavy feeders, and would prefer a rich soil to start. Add compost or natural fertilizer at least once through the growing season. You could also use your fish-tank water (without chemicals) to water the pumpkin roots - perfect! GENTLY water the root area only, avoiding getting the leaves wet (to prevent powdery mildew). Turn off the water when it puddles for longer than 3 seconds.

Leave the blossoms alone. Remember, if you pick them for fried/battered squash blossoms (yes, good eating), then you won't get any pumpkins. Bees will pollinate the flowers, or you can use the q-tip method. A fruit will begin to form and grow. Your harvest will depend on temperature, watering, nutrition and quality of seed.

When the fruit is well established, gently move the pumpkin so that the blossom end (opposite of stem end) rests on the ground (you may have to clip some tendrils or get help to avoid breaking the vine or stem). Rearranging the pumpkin will encourage the usual pumpkin shape we're used to. While you're moving it, slip a board underneath it. This will prevent a soggy (then rotting) bottom when you get a hard rain.

Pumpkins will love your lasagna garden (that blog posting will come in year 2009), but don't do well in a square foot gardening scenario. They need a lot of room to sprawl and ramble. We once heard of someone who ignored a jack-b-little pumpkin plant, and it ended up crawling across the lawn and up a tree, dangling little bitty pumpkins by early September. Can you imagine the surprise to see the "pumpkin tree"? We've also heard of pumpkins crawling up over sheds and porch railings. Support any heavy fruits with pantyhose.

By late August (in the northern Hemisphere), the days will start to get shorter and the nights colder. Pumpkins will start to change to their ripe color. The vine will start to look aged, with withering vines and rotting leaves. (This is the worst time for a gardener who revels in the glorious green of her garden.)

They are ready to harvest when the color has deepened - orange will look like a typical grocery store pumpkin, like a sunset. Use garden shears, cutting the stem at the vine, to leave as much of the stem intact as possible (minimum 3 inches). Let them cure in the sun for 10 days or so. Cover them at night if there's a danger of frost. Store in a dry cool place (basement, root cellar).

Pumpkins store well for a few months in a cool environment, sometimes until the next Spring. If you don't have access to somewhere cool, you can preserve them by:

  • making pumpkin puree, canning or freezing
  • dehydrating pumpkin slices

Butternut squash tastes a lot like pumpkin. It makes a delicious "pumpkin pie", and the shape of the squash could encourage creativity for jack-o-lantern faces.

Growing pumpkins? Let us know.