This is a good meal to make on the grill.
Ingredients:
1/3 cup chili sauce
2 tablespoons honey
4 chicken thighs or breasts
1 can pineapple chunks
2 cups dried broccoli dices
1 cup dried bell pepper dices
1/2 cup dried onion dices
salt/pepper to taste
Directions:
Empty the pineapple juice from the can into a bowl. Add the dried broccoli, bell pepper and onions to the bowl and allow to rehydrate. Prepare and preheat the grill. Combine the chili sauce and honey with the veggies and pineapple juice. Cut two 12x12" pieces of heavy duty foil. Spray with non-stick spray. Place the chicken in the center of one piece of foil and top with veggie mixture and pineapple chunks. Top with remaining piece of foil (spray first) and fold the edges twice to seal. Cook on the grill until chicken is thoroughly cooked.
Added the following April 6 2009:
Cost:
Today I bought a package of 4 chicken thighs for $2.78 (on sale, with an orange sticker).
2.78 = pkg 4 chicken thighs
1.00 = can of pineapple
.28 = chili sauce
.10 = honey
2.00 = dried vegetables/onions
===
6.16 total, but serves 4 people so... $1.54 per person
Copyright (c) 2009 VP Lawrence-Williams
Recipe: Roasted Garlic
 I had such a craving for roasted garlic the other day that I made a special trip to the grocery store just to get some fresh bulbs. Here's how to do it:
- Preheat the oven to 400 degrees F.
- Peel the outer skin from the garlic bulb but make sure the skin around the individual cloves stay put.
- With the root end on your cutting board, slice the top 1/4 off the bulb. This will expose the cloves. The root end will keep the cloves all attached together.
- Place the garlic head (bulb) on a sprayed piece of aluminum foil. (Some people use small pieces of aluminum in a muffin pan so they won't move around.) It's okay to place more than one bulb per piece of foil. Drizzle the bulbs with some olive oil, using your fingers to ensure the garlic bulb is well coated. This will prevent burning.
- Cover with more aluminum foil. Bake for 30-35 minutes, or until the cloves feel kinda squishy and soft when pressed.
- Allow to cool slightly. Use a small sharp knife to slit the skins around each clove. Squeeze the roasted garlic cloves out of the skins.
This is especially tasty when spread on crispy buttery bread. Or mash with a fork to use for cooking or adding to salad dressings. Or mix with sour cream to top baked potatoes. Or add to a little parmesan cheese, butter and pasta.
FYI: The big "whole" is the bulb, and the individual parts are called "cloves. Some people (yes, including the past me) get these mixed up.
Alternate: Instead of using the oven, you could roast it in the foil on a grill. The aroma it gives off sometimes flavors other foods on the grill.
Copyright (c) 2009 VP Lawrence-Williams
Blog Contest Starts Today!!
Let's get right to the contest ... we aren't requiring you to do much to enter the contest. Here's the details:
Dates:
Entries will be accepted March 30 through April 5, 2009 ... The contest started when we uploaded this "Blog Contest Starts Today" post at 12:01 AM (Denver, CO, USA MDT) on March 30. So if you are reading this post before midnight on April 5, there's still time to post your entry comments.
Dates:
Entries will be accepted March 30 through April 5, 2009 ... The contest started when we uploaded this "Blog Contest Starts Today" post at 12:01 AM (Denver, CO, USA MDT) on March 30. So if you are reading this post before midnight on April 5, there's still time to post your entry comments.
2 Ways To Enter:
- Write a 50-100 word review (in English) about a survival or homesteading book. Leave the review as a comment under the "Blog Contest Starts Today" post, and be sure to include your name in case you're the winner! Each comment gets you 2 entries! You can comment more than once but each comment/review needs to be about a different book.
- Leave a comment on the "Blog Contest Starts Today" post, showing where you've linked about this contest and this post on YOUR blog and/or website. We'll be checking! Each link gets you 1 entry.
Prizes:
Winner will receive the following:
- a $40 gift card to Amazon.com - to spent on what you want - seeds, books, groceries, etc.
- a $15 coupon/gift certificate to our online bookstore
- a copy of "The Live Food Factor, The Comprehensive Guide to the Ultimate Diet for Body, Mind, Spirit & Planet (by Susan Schenck, Lac), a $32.95 value. Includes $3 shipping. Anyone out of the USA must paypal $10 for additional shipping.
Rules (ugh - but a necessity):
Spam or unsuitable entries will be disqualified and deleted. Random drawing from entries will be done on April 6 2009. Winners will be notified by a blog posting on April 7 2009.
Pass the word about this contest and blog, and link / twitter / facebook / etc. whenever possible. Start commenting!
Food Preparation for an Expected Power Outage
 We had a blizzard this week. The weather people told us to expect it, but because we really haven't had bad weather this Winter, most people ignore the warnings. As they did this time. We didn't. We had prepared.
This picture shows our backyard as seen through our back door. Poor Sparky-the-puppy wanted to get in but I made him wait so I could take this picture. We got about 15 inches in 24 hours. By the time it was done, those pots in the back (last year's tomatoes) were in a 3-foot snow drift.
If you know there's a possibility of losing power, think about these:
- Many fruits and vegetables will hold their quality at room temperature, so keep some of them on hand always.
- Apples, bananas, tomatoes, grapes, heads of lettuce, squash, onions, potatoes, celery, peppers, and other produce will store well as long as they are stored in a cool and dark place.
We were ready. We had been stocking up for a while: rice, beans, honey, salt, dried fruits and vegetables, powdered milk, case of soy milk and bags of cereal for Tween. But...I went to Sam's Warehouse last weekend to stock up for my raw foods diet experiment. Spread on the dining room table are bags of pears, oranges and apples, bunches of bananas, onions and potatoes. We have even more potatoes (sweet and baking) plus onions in the basement, along with squashes and pumpkins left from our last year's harvest. The carrots from the fridge could have been moved to the basement.
We have sterno and a chafing dish for warming diced potatoes and onions. We have small cast iron skillets that will work with a little stove we made from a canned-ham-can and tea-lights.
Our power stayed on, but still, we were ready!
Money Saver Menu #4: Potatoes and Pasta
When trying to figure out the next money saver menu, I was noticing how cheap potatoes can be, when bought in bulk. Sometimes you can find a bag with 10-12 potatoes for around a dollar. That prompted today's dinner menu: stuffed potatoes!
Breakfast:
.25 = 1 serving rolled oats cooked with...
.20 = 1 serving raisins then added to it...
.05 = 1 tablespoon honey
.08 = 1 cutie orange to the side
===
.58
Lunch:
.20 = 1 serving pasta (spaghetti is usually cheapest), dressed with...
.13 = 2 tablespoons olive oil... and
.19 = 1 tablespoon green can parmesan cheese... and
.20 = 2 tablespoons pine nuts... and
.37 = 1 tablespoon chopped fresh basil
.23 = 1 pear, bought on sale
===
1.32
Dinner:
.20 = 2 baked potatoes (1 @ .10 ea), topped with...
.20 = 2 servings butter (1 @ .10 ea)... and
.10 = 2 tablespoons chopped onion (1 @ .05 ea)... and
.60 = 4 tablespoons hormel bacon (1 @ .15 ea tablespoon)... and
.04 = 2 tablespoons dried spinach (1 @ .02 ea)
.25 = 1/2 can peas and carrots
===
1.39
These three meals total $3.29, way under our $5.00 goal. Does not include snacks, drinks or leftovers. The stuffed potatoes for dinner is very filling... add 1/2 a can of garbanzo beans/chickpeas for $.50 if you need more protein.
If you need more protein for dinner, add a boiled egg for about $.25 each. You could spend the remaining $1.71 for snacks like more fruit and veggies, popcorn, or drinks. Or place it in a jar to save for something special.
Those $1 a day experiments...
 I was watching the news yesterday morning when I saw a story about a woman eating for 30 days on $1 a day ... that's a DAY! Her rules included "nothing that she had in her pantry or that she'd bought previously". She had a rough first week because she was basically stocking her pantry, but by the end of the experiment, she felt like she'd done ok. One of her last meals was a Japanese cabbage stir fry. The problem was... she didn't eat very well, and didn't get enough to eat or good nutrition or balanced meals.
From time to time I post articles here about how to eat for $5 a day per person. It's hard but I do my best. This is, obviously, for people who have stored food, a garden, or the actual means to spend money for food. This doesn't address the homeless problem, begging for food, dumpster diving, or getting the uneaten food that restaurants throw out (like Einstein bagels).
Setting a goal for $1.00 a day just isn't healthy, unless you raise almost all of your food yourself. I think I'll stick with providing you, our readers, money-saving-menus at $5.00 per person per day. We'll post another in a couple of hours - still working on it!
Recipe: Raw Dried Flax Crackers
 I've been on a mostly-raw-food diet since Monday Mar 23. Trying to get healthy. It's hard to fulfill my goals and not even be able to walk half a block without stopping to catch my breath!
Since others have expressed an interest on how to eat "raw foods" with stored foods, I'll start posting recipes when I've perfected them. I'll be using a lot of dehydrated fruits/veggies, nuts and flax.
This picture shows the ingredients for these two types of flax crackers. The ground flax seeds container was about $10 at Sam's. For the bowl to the left, Chocolate Flax Crackers, I used the cocoa powder a couple of bucks at Kroger/King Soopers and on top of it is the packet of stevia. For the bowl to the right, Savory Flax Crackers, I used the onion and garlic powder, $.50 each at Wal-Mart.
Savory Flax Crackers
Ingredients:
3 scoops ground flax seeds
1/2 teaspoon onion powder
1/2 teaspoon garlic powder
1 cup water
Directions:
In a small to medium mixing bowl, add the ground flax seeds and the onion/garlic powder. Mix well to combine. Add the water and stir. Leave it for 15 minutes, stir again. Leave it for 30 minutes and stir again. It will be very gooooey and gelatinous. That's ok - that's exactly what you need to happen. At this point you can add a tablespoon of flour (rice, wheat, etc.). Prepare your dehydrator with the teflex sheet. If you don't have one, take two pieces of plastic wrap and criss cross over the sheet. Cut a hole for your dehydrating mechanism/insert thingy (see picture). Spread the goo over the plastic or dollop into circles/crackers. Dehydrate until dry to the touch. Turn them over (carefully!) and dry until crisp. Could be 8 hours.
Sweet Chocolate Flax Crackers
Ingredients:
3 scoops ground flax seeds
1 tablespoon pure cocoa powder
1 packet stevia
1 cup water
Directions:
Follow the directions for the Savory Flax Crackers - combine the flax with the chocolate and stevia before adding water. The rest of the directions are the same. For more of a chocolate cookie, I add a bit more water and some ground almonds/almond flour. Dehydrate till crisp.
Enjoy!
Copyright (c) 2009 VP Lawrence-Williams
Recipe: Homemade Peanut Butter
 With the horrible pictures of the peanut butter factory, mold growing everywhere, critter droppings, etc..... who on earth would ever buy peanut butter again? And is that peanut butter powder we have stored safe?
Better to be safe. I found this recipe for making your own peanut butter. Experiment with cashews, almonds, macadamia, and other nuts too.
- Spread raw in-the-shell peanuts evenly on a cookie sheet. Bake in a preheated 350 degree F oven for 15-20 minutes, stirring often.
- When peanuts are done, the shell will be brittle, and the "skin" will slip off easily. They'll be light brown with a roasted flavor.
- Place 1 cup of freshly roasted/shelled/de-skinned peanuts into a blender or food processor. Turn on machine and while it runs, drizzle about 2 tablespoons of peanut (or canola) oil through that opening at the top. Rule of thumb: 1 cup of Virginia peanuts + 2 tablespoons of oil OR 1 cup of Spanish peanuts + no oil.
- Add a dash of salt (to taste). Process until you get the desired texture (crunchy or a little bit longer for smooth).
- Alternative: add a little honey, molasses or chocolate syrup for a different taste
- Store any leftovers in the refrigerator. Note that it won't last very long because it has no preservatives so try to eat within a couple of days. The oil may/probably will rise to the top so just carefully mix it a little before using.
- NOTE: It will feel a little less dense and taste differently than what you get at stores, but that's because it doesn't have all of those heavy shortening oils and preservatives.
Nut butters are a great way to get protein. They have lots of nutrition with vitamins and minerals. Keep your nuts (and seeds and peanuts) in the freezer until ready to roast, shell and make into nut butter.
This is a great way to get peanut butter that you're pretty sure is free of contaminants. To be 100% sure, grow you own peanuts and nuts!
Recipe: All-Vegg Powder
As a mom of a picky eater, I have to be creative to get a variety of vegetables into my VHTS (Very Hungry Tween Son). He LOVES fresh fruit, and some veggies (raw spinach, raw broccoli, raw cauliflower and raw carrots), but it doesn't go much beyond that. I've tried dehydrating bits of broc and cauli but he doesn't like them that way. He'll eat dried corn and peas, but those are the only veggies.
A friend turned me onto "all-vegg powder". Here's basically how to make it:
A friend turned me onto "all-vegg powder". Here's basically how to make it:
- Dehydrate lots of different kinds of vegetables. Include the above plus eggplant, celery, tomatoes, potatoes, okra and much more. Buy dried if you don't garden. Add dried garlic, onion and spices if you'd like. (For spices, a little goes a long way.)
- Using a mortar/pestle, spice grinder or any other way you can, make powder from the various dried vegetables. We have a little food processor that cost $12 at Wal-Mart. Works great.
- Mix the different veggies and spices together.
- Store in a tightly-sealed mason jar. Lightly shake before opening for use.
- Sprinkle this on rice, in mashed potatoes topped with cheese, in scrambled eggs, and any other way you can think.
 Above: Provident Pantry (PP) cauliflower pieces, parsley from Vitamin Cottage (VC), spinach flakes from VC, PP broccoli florets, carrots from VC, soup vegetables from VC, onion flakes from VC and garlic granules from VC. This is just part of what I've powdered to make all-vegg powder. I also included from our garden: dried eggplant, dried tomatoes, dried okra, etc.
NOTE: This is a good way to get more raw-food nutrition - especially if you have dehydrated your own veggies and know they were done at a temperature less than 115 degrees F.
Avian/Bird Flu Prep
Many people don't believe the bird flu will actually happen. That's ok. However, even if you think the whole bird flu thing is nonsense, it does make sense to prepare for the super-flu and super-bug that is making the news already.
Here's a few suggestions:
Here's a few suggestions:
- Eat healthy. Avoid packaged and processed foods. Concentrate on foods as close to how nature provided them, like fresh fruits and vegetables, nuts and seeds, whole grains.
- Exercise at least 20 minutes a day, 5-6 days a week. This will not only make your body fit but will help your immune system, raise your tolerance, and help you mentally and emotionally. Even young children can exercise a little every day (sometimes we play "chase the dog" which gives us all a snippet of exercise).
- Reduce your stress. This may mean cutting back on extra activities, saying "no" more often, or shopping before dawn to avoid crushing crowds. You could spend quality time with family and friends - your loved ones - playing a board game or singing along with a karoake machine.
- Meditate (or pray) daily. Your mind needs some time to just chill, as does your spirit. If you don't pray, sit comfortably while listening to soothing music and watching a candle-flame flicker in the dark.
- Have sex with a caring mate regularly (a couple times a week should work). This helps your body in many ways!
- Add a bit of vitamin C and echinacea to your supplement regimen. These will help your immune system.There is not nor will there be (in time) a vaccine to protect you from the bird flu. Your best defense is always a good offense. Get your body's natural immune system to it's peak and keep it there.
The 1917 bird-flu epidemic killed (an estimated) 50 million people, of which 675,000 were in the United States. Experts say another pandemic is very overdue. What else can you do to make sure you don't succumb to the next round?
- Look at your home. Is there a room that you can care for sick family members, away from other people? (Keep the germs contained.)
- Stock up on medical supplies, like Vitamin C, multi-vitamins, cough medicine, disposable gloves and surgical masks.
- Stock up on basic supplies, like food, can openers, toilet paper and water. If a pandemic really does hit, chances are people will be forced to be confined to their homes. Be prepared.
Disclaimer:
(Gotta write this because I'm just a writer and not a health care professional of any kind): If you think you might be sick, consult with a trusted health care professional. Also, discuss with your doctor before starting any new diet or exercise. Statements in this posting have not been evaluated by the FDA or anyone else.
Blog Contest Coming Soon
Who-hoo! We're putting on our very first blog contest. We won’t require you to do much to enter the contest. Here's the details:
Dates:
Entries will be accepted March 30 through April 5, 2009 ... The contest starts when we upload the "Blog Contest Starts Today" post at 12:01 AM on March 30. At that time, you can start posting your entry comments.
2 Ways To Enter:
We're working on them. How about several packets of seeds? A raw foods book? A survival e-book? NOTE: If we get lots of prizes, we'll do first, second and third place winners. So... if you know of a company (relevant to the topics on the blog) who'd be willing to donate a gift card, please have them contact us! We would love to give away gardening equipment, dehydrated food, etc. The prizes (and prize levels!) will be listed in detail in the "Blog Contest Starts Today" post.
Rules (ugh - but a necessity):
Spam or unsuitable entries will be disqualified and deleted. Random drawing from entries will be done on April 6 2009. Winners will be notified by a blog posting on April 7 2009.
Pass the word about this contest and blog, and link whenever possible. You get reading while I get to accumulating the donated prizes!
Dates:
Entries will be accepted March 30 through April 5, 2009 ... The contest starts when we upload the "Blog Contest Starts Today" post at 12:01 AM on March 30. At that time, you can start posting your entry comments.
2 Ways To Enter:
- Write a 50-100 word review (in English) about a survival or homesteading book. Leave the review as a comment under the "Blog Contest Starts Today" post, and be sure to include your name in case you're the winner! Each comment gets you 2 entries! You can comment more than once but each comment/review needs to be about a different book.
- Leave a comment on the "Blog Contest Starts Today" post, showing where you've linked about this contest and this post on YOUR blog and/or website. We'll be checking! Each link gets you 1 entry.
We're working on them. How about several packets of seeds? A raw foods book? A survival e-book? NOTE: If we get lots of prizes, we'll do first, second and third place winners. So... if you know of a company (relevant to the topics on the blog) who'd be willing to donate a gift card, please have them contact us! We would love to give away gardening equipment, dehydrated food, etc. The prizes (and prize levels!) will be listed in detail in the "Blog Contest Starts Today" post.
Rules (ugh - but a necessity):
Spam or unsuitable entries will be disqualified and deleted. Random drawing from entries will be done on April 6 2009. Winners will be notified by a blog posting on April 7 2009.
Pass the word about this contest and blog, and link whenever possible. You get reading while I get to accumulating the donated prizes!
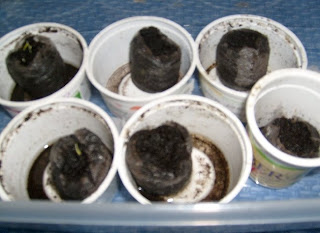
Tomato Update
I had no idea what to write about today. Just sitting at the computer, thinking, making notes, and pretty much wracking (racking?) my brain. I happened to glance at the plastic shoe tub with my 6 tomato starters in it. Wonder how they're doing? It was a busy weekend, and I hadn't checked them since Friday.
Here's a pic of them on 3/6/09, when I first placed the seeds in the rehydrated Jiffy Pellets:

Here's a pic of them today - 3/21/09! Two have sprouted... The Amish Paste and the MoneyMaker ... two I've never grown before. The top left and bottom left are the ones that sprouted. Don't they look beautiful! I love this part.... when the itty bitty seedlings burst above the "soil's crust".
Here in the Denver area we're actually supposed to get some snow today or maybe later this week. Yeah, right. We've barely gotten any this year. So.. to make it more Spring like, I think I'll sow some more seeds, for the plants we'll leave behind when we sell the house (or we'll eat, depending on how long it takes to sell the house.) Watermelon, cantaloupe, carrots, greens, etc.
Raw Food Diet on Stored Foods?
My health is horrible. I eat junk, even though I'm supposed to be getting healthy by changing my eating habits. I'm a cheeseburger and pizza junkie. I love cookies and cakes and ice cream. I try to eat a lot of stored foods, but I need to get out of the MickeyD's cheeseburger/Big Mac mindset to enjoy them. I'm a really picky eater; I don't like most cooked vegetables but I'll eat them raw. However, the taste of them changes when they are dehydrated, which is necessary to make them last over the Winter.
A wonderful lady, Susan Schenck, is considering donating her book "The Live Food Factor" to our blog contest but that got me thinking. I did the raw food diet a few years ago, and felt great while on it. Then I slipped and couldn't get back on for various reasons.
Now, I'm wondering. Is it possible to get back on the raw food diet and actually survive on it via stored foods if confined for a long while?
I went over my list of stored foods. Here's what we store that qualifies as raw:
-dehydrated fruits
-dehydrated vegetables
-beans/peas/lentils/soybeans
-rice and corn pasta
-rice? cornmeal? oats?
-pre-ground flax seeds (40 oz container-expires 2 years unless opened)
-frozen walnuts, pecans, almonds, cashews, peanuts
I'm sure I missed a few things.
And I'd have to grind the vegetables into a powder (all-vegg powder) to make them palatable (to me).
Our garden can/has produced the following, which we can either freeze (not preferred in case of loss of electricity) or dehydrate:
-peanuts
-corn
-sunflowers
-eggplant
-beans, including string and soybeans
-peas
-tomatoes
-okra
-peppers (bell and hot)
-greens
-radishes
-carrots
-etc.
On our homestead we'll plant lots of fruit and nut trees so we'll have those to freeze or otherwise store (almonds, pecans, walnuts, filberts, apples, pears, nectarines, etc.). Bushes of cherries, blueberries, cranberries and elderberries. Vines of grapes and passionfruit.
Plus we have growing inside year round a couple of tomato plants. In the Winter we grow carrots, radishes and greens like lettuce and spinach. We just started adding sprouts to our indoor "gardening". Could possibly add blueberry to year-round. Possibly strawberries. If we get/build a house with a big south-facing room with lots of windows, we could grow even more, like the lime/lemon/tangerine tree, banana tree plants, and more.
So... I could, depending on the availability, eat a fresh salad every day from our indoor and outdoor garden with a variety of veggies to go in it. I could eat my special crackers (below) with a variety of nut butters, salsa, guacamole, or raw hummus. Fresh or rehydrated fruit drizzled with homestead honey. Gazpacho (raw soup with tomatoes, cucumbers, etc.).
When I was full-on gluten-free a couple of years ago, I learned how to make a raw flax cracker. (Will post recipe soon - I made one that was unbelievably delicious.) Could grind the beans/peas/lentils/rice and add as "flour" to the cracker, along with the cornmeal/corn masa. Maybe even oats. Could add powdered veggies - the ones I don't like - and spices/herbs to change up the taste. This is a cracker that's dehydrated so it would qualify as raw.
I'm going to look into this and start posting raw-recipes as soon as possible. Perhaps this would help my myriad of symptoms if I'd just get off the junk food. Does a diet that has 85% raw food interest anyone besides me? Vikki
Inventory Check: Eye Wash Cup
 What the heck's an eye wash cup, you ask? Well, if you have ever gotten something in your eye and had to go to the emergency room or even (years ago!) your doctor, you know.
 It's a little "cup" like to the right (there are many). It is shaped to seal around your eye and wash out whatever is there that isn't supposed to be. You can use a special eye wash or salt-water mixture or even just CLEAN water, put your eye to the cup so that it's sealed. Lean back and blink a few times to let the water wash out your eye.
This is a necessary item in your first aid kit. Be sure to include several, and different varieties.
Recipe: Quick Sausage Dinner
This is almost a complete meal, all but one ingredients is from your stored freeze-dried / dehydrated foods. Yummy!
Ingredients:
4 cups chicken broth
3 cups dried potatoes dices
2 cups dried sausage crumbles
2 cups dried carrot dices
1 cup dried cauliflower dices
1/2 cup dried onion dices
Directions:
Add all ingredients to a medium saucepan pan and let sit for 20-30 minutes to rehydrate. Add water if necessary. Gently add heat to medium, cooking until all is heated through. Serve hot, with perhaps a fresh cole slaw.
Alternate:
Place a large sheet of super-strong aluminum foil in a large outdoor baking dish or lipped-baking sheet (for strength). Add all ingredients, and fold the foil into a packet. Let sit for 20-30 minutes to rehydrate. Heat on grill or cookfire until food is heated through.
Copyright (c) 2009 VP Lawrence-Williams
When Toilet Paper Runs Out...
Substitution for Every-Day Items:
You store 48 super-size packages of toilet paper, but you've been confined to your home due to [fill-in-the-blank] for a long time and you're down to your last package. What do you do?
Warning: This is not a post to read if you have a queasy stomach or while you're eating!
You store 48 super-size packages of toilet paper, but you've been confined to your home due to [fill-in-the-blank] for a long time and you're down to your last package. What do you do?
Warning: This is not a post to read if you have a queasy stomach or while you're eating!
- You could make your own toilet paper by making your own paper (will post a how-to within a month or so)
- You could use other things like:
-Kitchen towel (ick)
-Old newspaper (crumple to get soft)
-Phone books (ditto)
-Mail-order catalog (ditto)
-Bank notes or other laying-around paper, leaves (ditto) - Other Methods:
-a bidet + towel to dry off
-an upturned shower head + a towel to dry off
-a wet sponge (that's how the Romans did it)
-your hand - which is how people in the third world do it - that's why you see them eating with their opposite hand!
As for water use, a drought is always a concern and must be dealt with prudently. Discuss with your family members what to do should you run out of toilet paper. Start working on an alternate plan now.
Spring has Sprung

Happy Spring (Vernal) Equinox
Celebrate with a flower, a deep breath and a smile. Pass it on!
Recipe: Last Minute Dinner Muffins
These dinner muffins are very easy and quick to make. Get them baking while you set the table, get the kids' hands washed, and drinks poured. Should be ready by the time you sit down to eat. And yummy!
Ingredients:
1 cup flour
1 teaspoon baking powder
1/2 teaspoon salt
1/2 cup milk (we use soy)
2 tablespoons mayonnaise (odd but yummy)
Directions:
Preheat oven to 350 degrees F. Place 5 cupcake liners in your muffin tin. Mix all ingredients in a medium bowl. Spoon into the cupcake liners. Bake for 15 minutes or until lightly browned and puffed-up.
Copyright (c) 2009 VP Lawrence-Williams
Substitution for Electronic Watches
Watches: Old Fashion Wind-up versus Digital and Electronic
The battery in my watch died about the same time as our VHTS. It got me thinking. In these days, it seems like everything is being digitized or computerized or both. Especially watches. What happens if for some reason we don't have a battery handy when the one in the watch dies, or worse yet we are out where there isn't a Wal-Mart or other store available?
Society now seems to think that if you don't have the latest hi-tech watch with every possible function or a cell phone, blackberry or computer then there must be something wrong with you. But if you are out in the woods and your cell phone has no service then how do you keep the clock on it accurate and keep it going with no electricity to charge the battery?
Primitive or an old-fashioned wind-up analog watch can be a very important item to carry with you. First off you don't need to put a new battery in it to keep it working. You just need to make sure to wind it every day (or some work when you move your arm and it will self-wind.)
A wind-up watch can be used in other ways:
- If you are lost and the sun is out, then you can find north using the hands of the watch and the sun. The process is to point the twelve toward the sun and then figure the direction by splitting the area between the hour and the minute hand and head in the direction of the difference.
- If the watch is a glow-in-the-dark kind, and you have been out in the sun, then you will be able to see the time for hours without having to use a battery.
- If you need to time something, the second hand makes a nice timer.
- If you don't have matches and need to start a fire during the day, the watch lens makes a good magnifying glass in a pinch. Some even have a magnifying portion for numbers to small to be seen but will also catch the sun.
- Another advantage is that if the watch should happen to get wet, the spring will work after it dries but won't short, burn or run out of energy like a battery would do.
- The face of it is shiny enough will act as a mirror if a rescue plane is flying by that you can reflect sunlight at it and attract attention.
So the next time that you see someone using an old-fashioned wind-up watch to check the time, you might want to ask the person where they got it! They might be more in touch then most people think.
By DougCelebrate the Spring Equinox
Tomorrow... the Spring (vernal) equinox will occur (March 20 2009) at 11:44 a.m. at Coordinated Universal Time (UTC).
The March equinox is the movement when the sun crosses the true celestial equator – or the line in the sky above the earth’s equator – from south to north, around March 20 (or March 21) of each year.
There are two days a year that are pretty much equal day to night - 12 hours each. That's because the Earth’s axis of rotation is perpendicular to the line connecting the centers of the earth and the sun.
In gyroscopic motion, the earth’s rotational axis migrates in a slow circle based as a consequence of the moon’s pull on a nonspherical earth. This nearly uniform motion causes the position of the equinoxes to move backwards along the ecliptic in a period of about 25,725 years.
Many people don't celebrate this as anything special, but in our family, we welcome the changes of the season. Although we enjoy Winter, we LOVE the arrival of Spring, and celebrate rebirth and growth. Here's when we start the seedlings of the plants that will eventually bear fruit (or veggies!).
How to celebrate Spring - whether tomorrow or maybe this weekend:
Get into the mood for the Spring Equinox by taking a stroll through a field of flowers. Perhaps there's a botanical gardens or park or something similar near you or in the nearby countryside. If you can't, stop by Wal-Mart or your local florist and pick up some fresh flowers - just choose whatever appeals to you without worrying about them making a beautiful bouquet!
Time to plan for the next year. Think about the symbolism - Spring is rebirth and fresh life. Make that about your fresh life. What do you think you can change about your life. Today. Right now. Not waiting until the weekend, or Monday.
Decorate your home with fresh flowers. Wear flowers - whether a pattern in the cloth, or a fresh bud in your lapel or your hair. Burn jasmine or any other floral incense or candles.
This is the time for a great feast! You may choose to celebrate during Easter, but it need not wait! Serve a delicious salad with greens (that you planted a few weeks ago) with fresh alfalfa or broccoli sprouts and tossed with pumpkin and sunflower seeds. To celebrate the new life of farm animals, this is the time to serve lots of fresh butter and cheese (dairy products), and to make hot cross buns or fresh honey-baked wheat bread with the last of (usual) stores.
Color some eggs! Boil eggs with a single onion skin for soft orange. For rust, toss in a handful of onion skins, or a beet with vinegar for more of a pink/red color. Half a teaspoon of turmeric will give a nice yellow.
How do YOU celebrate Spring?
How Can We Improve Our Blog?
We have a contest coming up, and are also looking for guest posters. We are working to increase posts about gardening, preserving, cooking methods, etc. But meanwhile, we are asking YOU ... how can we improve our blog?
More personal info? More tags? More money-saving menus? More links?
We're doing this blog to help people who are like us: preparing for any eventuality. So... let us know by commenting to this post (anonymous is fine). We WANT your input!
Thanks... Vikki and Doug
More personal info? More tags? More money-saving menus? More links?
We're doing this blog to help people who are like us: preparing for any eventuality. So... let us know by commenting to this post (anonymous is fine). We WANT your input!
Thanks... Vikki and Doug
Recipe: Banana-Strawberry Smoothie
Next time you buy bananas on sale, or you get a great deal on them because they're a little "too ripe", get a bunch! (Get it? Er, sorry). When bananas are ripe, peel them, break into 1-2 inch pieces, wrap tightly in plastic wrap, label, and freeze. This will help you make sure you have bananas the next time you want a smoothie!
Ingredients:
1-2 frozen bananas
1 cup frozen strawberries
8 ounces milk (we use soy milk)
Directions:
Add milk to blender first, then add frozen fruit. If desired, add a scoop of protein powder. Blend until smooth.
Add other fruit as desired. Sometimes we take whatever harvests that day: raspberries, blackberries, blueberries, etc. If you need a little more liquid, you could use apple juice too.
Copyright (c) 2009 VP Lawrence-Williams
How to Make Fire-Starters
Here are a few ways you can make "fire-starters" - useful tools when you are depending on a fire to get you warm and feed you.
Method #1: You need:
Newspaper
Twine
Wax
Directions:
Cut newspaper into 4 inch strips and roll them up tight. Tie the rolls with twine leaving about 2 inches of twine for dipping into paraffin wax or melted reserved candle wax. Dip the whole thing into the wax. Store. Use the twine as a wick to light. These are light and easy to carry.
Method #2: You need:
Dryer Lint
Egg Carton
Wax
Directions: Gather lint from your dryer. Take your paper (not styrofoam) egg carton. Cover the bottom of each egg carton section with lint. Melt wax (safely!). Pour the wax into each egg carton section that has lint in it. Once the wax has harden, break apart, and store. When ready to use, light the carton section and place in the tinder you've arranged where you want your fire. The carton will burn through to the lint and the wax will keep it going. These are also light and easy to carry.
Note: There's a little controversy about the above method, because clothes these days are made with so many artificial fibers. Some people are concerned using lint from these non-natural fiber clothing could create bad fumes when burning these fire starters. Use your own judgement.
Method #3: You need:
Newspaper
Toilet paper roll cardboard
Directions:
Stuff the cardboard roll with wadded newspaper - not too tightly so that air can get in. Place within the tinder and light. These take up a bit more room so they are better for at-home use.
Method #4: You need:
-empty clean tuna can
-cardboard
-wax
Directions:
Wash and dry the can. Cut long pieces of cardboard about 1 1/2 inches wide (wide enough to fit in the can with a little above). Roll these pieces into tight spirals. Pour the empty cans about half full of melted wax. Carefully add the cardboard spirals and let the wax set. There should be enough cardboard showing above the can to light. This is a method I learned in girl sprouts! These are a little more bulky but have always been reliable for me.
Other Methods:
-dried pine needles
-crumpled up newspaper
-dryer lint by itself
-pine cones lightly dipped in wax
-craft sticks/popsicle sticks
-unraveled twine
Store a couple different fire-starters in your bug-out-bag or camping supplies. Better to not put "all your eggs in one basket". Remember to store your supplies where moisture can't get to them. These should last quite a while, and are usually very reliable.
NOTE: When melting wax, only use a double boiler set up. Melted wax can easily ignite.
Have a fire extinguisher handy in case of emergency.
Recipe: Pico de Gallo
This is a great recipe for a "condiment" that's used similarly to salsa. However, I don't really care for cilantro so I use parsley. Tastes better for us, and didn't change it so much that other people won't eat it. Enjoy!
Ingredients:
1 bunch cilantro (or parsley)
2 large tomatoes (we prefer red)
2 large fresh jalapeno peppers
1/2 large onion
dash fresh lemon (or lime) juice
Directions:
Take out the seeds from the peppers if you don't like too much heat. Dice/chop all of the ingredients (except citrus). Toss with lemon juice. Chill. Goes well as a condiment for meat, or with fajitas.
Copyright (c) 2009 VP Lawrence-Williams
Off-Topic: Rant about AIG - again
Saw this on my yahoo e-mail sign-on page yesterday:
AP - Joining a wave of public anger, President Barack Obama blistered insurance giant AIG for "recklessness and greed" Monday and pledged to try to block it from handing its executives $165 million in bonuses after taking billions in federal bailout money. "How do they justify this outrage to the taxpayers who are keeping the company afloat?" Obama asked. "This isn't just a matter of dollars and cents. It's about our fundamental values."
Saw this on today's yahoo sign-on page:
AP - Senate Democrats vowed Tuesday to all but strip AIG executives of their $165 million in bonuses, as expressions of outrage swelled in Congress over eye-catching extra income for employees of a firm that has received billions in taxpayer bailout funds.
Here's a link to AIG's homepage: http://www.aig.com/Home-Page_20_17084.html and here's their contact information: Contact AIG by email or phone Call M-F 6am-8pm ET USA: 1-877-638-4244 Worldwide: +1-908-679-3150
I realize that a lot of people depend on AIG for life insurance, auto insurance, retirement services, relocation, investments, etc. I get that, and I get that it would be horrible for AIG to go out of business.
I also realize that according to some, the bonuses mentioned above were promised, and therefore, AIG is contractually obligated to give out those bonuses. Question: can't the people who are contractually obligated to receive the bonuses... REFUSE THEM? I'm thinking that even if they can't refuse the bonuses, it would really behoove these executives to return the money to the company. Some way. Some how.
Come on, AIG. Do the right thing. Stop wasting MY money.
As for everyone who does business with AIG, look into moving your business elsewhere. If clients disappear, AIG will be forced to close its doors. Yes, I'm also thinking about the employees like secretaries, accountants, file clerks, maintenance, etc. - the people who really run the company. Wouldn't it better for them all to look for new jobs now, or for a nice competitor of AIG to hire all the employees carte blanche.
President Obama: We expect you to handle this.
UPDATED March 18 2009 at 6:15 AM: Can American Taxpayers bring a class action lawsuit again AIG for misuse of taxpayer funds?
AP - Joining a wave of public anger, President Barack Obama blistered insurance giant AIG for "recklessness and greed" Monday and pledged to try to block it from handing its executives $165 million in bonuses after taking billions in federal bailout money. "How do they justify this outrage to the taxpayers who are keeping the company afloat?" Obama asked. "This isn't just a matter of dollars and cents. It's about our fundamental values."
Saw this on today's yahoo sign-on page:
AP - Senate Democrats vowed Tuesday to all but strip AIG executives of their $165 million in bonuses, as expressions of outrage swelled in Congress over eye-catching extra income for employees of a firm that has received billions in taxpayer bailout funds.
Here's a link to AIG's homepage: http://www.aig.com/Home-Page_20_17084.html and here's their contact information: Contact AIG by email or phone Call M-F 6am-8pm ET USA: 1-877-638-4244 Worldwide: +1-908-679-3150
I realize that a lot of people depend on AIG for life insurance, auto insurance, retirement services, relocation, investments, etc. I get that, and I get that it would be horrible for AIG to go out of business.
I also realize that according to some, the bonuses mentioned above were promised, and therefore, AIG is contractually obligated to give out those bonuses. Question: can't the people who are contractually obligated to receive the bonuses... REFUSE THEM? I'm thinking that even if they can't refuse the bonuses, it would really behoove these executives to return the money to the company. Some way. Some how.
Come on, AIG. Do the right thing. Stop wasting MY money.
As for everyone who does business with AIG, look into moving your business elsewhere. If clients disappear, AIG will be forced to close its doors. Yes, I'm also thinking about the employees like secretaries, accountants, file clerks, maintenance, etc. - the people who really run the company. Wouldn't it better for them all to look for new jobs now, or for a nice competitor of AIG to hire all the employees carte blanche.
President Obama: We expect you to handle this.
Senators: Yes! Absolutely STRIP these AIG executives of their bonuses and anything else you can.
Just my uninformed opinion, but I'm furious about AIG. Aren't you? VikkiUPDATED March 18 2009 at 6:15 AM: Can American Taxpayers bring a class action lawsuit again AIG for misuse of taxpayer funds?
A Couple of Hard Working Canines. Not.
Thought I'd post updates on our critters. The chihuaua is teaching Puppy new tricks:
- Like how to eat one morsel of food at a time. Doesn't work for a 30 pound 3 month old Dalmatian-Rottweiler-Alaskan Malamute (Dal-Rotti-Mute for short!) [We feed them in separate rooms now.]
- Like how to flap his ears for attention (bad habit for a future guard dog who must be quiet while patrolling the grounds!) [Shaking a can with pennies helps a little with the ear-flapping.]
But a good habit he picked up is barking at strangers who pass by our fenced-in yard.
Not so good is he wants to horn in on her arthritis medication. And in return, she tries to get at his food. 
We're working hard to make sure he doesn't keep any of these bad habits, but does keep the good ones. And we're doing "basic training" regularly - sit, stay, stop licking my foot, etc.
This picture was taken on March 7 ... just 10 days ago ... when the puppy is just 12 1/2 weeks old. Look at the difference in their sizes! The puppy is now three times the size of the chihuahua. And wow - he's smart - he puts his toys away which is more than I can say for the VHTS!
Recipe: Spinach Bits
This is the perfect appetizer to show off your homestead: spinach from your garden, goat cheese you just made, and pecans you shook from the tree just that morning!
Ingredients:
fresh spinach leaves
chavre (soft) goat cheese
pecans, halved
Directions:
Let the cheese get somewhat soft, place on a sheet of plastic wrap, roll into a log, refrigerate until harder, then cut into small rounds. Wash and pat dry the spinach leaves. Place a small round of goat cheese on a spinach leaf, and add two pecan halves on top. Roll each leaf up and place a toothpick in to keep it together. For color, add a very small cherry tomato on the toothpick.
Copyright (c) 2009 VP Lawrence-Williams
Asparagus and Strawberries for the Spring Garden
I convinced Hubby to go to my favorite nursery on Saturday. We hadn't been since Fall and I was in withdrawals. No matter that I'd already purchased several packets of seeds from my favorite online suppliers, and had already started my tomato seeds. Or that we haven't finished preparing the raised beds or containers yet. Nope, I drug (dragged?) Hubby and VHTS to Paulino's in North Denver for a look-see.
Came home with 10 asparagus roots, 25 strawberry plants, 1 blueberry bush, seeds for a eggplant specifically bred for containers, and adzuki and onion seeds for sprouting (eating as sprouts).
We decided to leave our two 8x4 raised beds for the next owners, and are hoping if we get them pretty green by June (when we put the house on the market) that people will be more apt to buy a house with a yard that's producing: asparagus, blueberries, strawberries, tomatoes, radishes, beans, greens and carrots. Hope we aren't looking at this with rose-colored glasses.
The first 8x4 raised bed, prepared to be acidic, will have:
Instead... we're planting as much as we can in 5 gallon pots/containers so we can move them to our new home. We have about 30 pots so this is our plan for them:
Came home with 10 asparagus roots, 25 strawberry plants, 1 blueberry bush, seeds for a eggplant specifically bred for containers, and adzuki and onion seeds for sprouting (eating as sprouts).
We decided to leave our two 8x4 raised beds for the next owners, and are hoping if we get them pretty green by June (when we put the house on the market) that people will be more apt to buy a house with a yard that's producing: asparagus, blueberries, strawberries, tomatoes, radishes, beans, greens and carrots. Hope we aren't looking at this with rose-colored glasses.
The first 8x4 raised bed, prepared to be acidic, will have:
- blueberry bush (already there - the only one that didn't die last year)
- 6 asparagus roots
- 20 strawberries
Last year we grew soybeans and carrots in the second 8x4 raised bed. This year we'll plant:
- 3 tomatoes on the north side of the bed, completely with marigolds and basil in between
- greens (black seeded simpson, buttercrunch, parsley, etc.)
- carrots (orange, red, yellow, purple and white)
- radishes
- 3-4 bush beans
In our front yard we have 3 small areas prepared where last year we grew tomatoes, soybeans, bush beans, cucumbers, squashes, pumpkins, asparagus (which have disappeared!), basil, borage, and black turtle beans. We also have (from last year) 4 roses which may or may not be alive, lots of crocuses and tulips, 2 red raspberry plants and about 15 strawberry plants that look like they survived the winter. The borage also never completely died so it might stay put.
This year we'll plant:
- Top area: boston pickling cucumbers to trail up the two posts from porch floor to roof
- Top area: already has 4 roses, which may or may not be alive, so we'll plant a few various yellow flowers there and might add a yellow-pear tomato in the middle of the row
- Middle area: yellow wax beans (because yellow is a good house-selling color; I don't like these beans so here's hoping the new owners do!)
- Middle area: a few hot pepper plants
- Bottom area: spaghetti squash (we think) because, again, yellow is a selling color. Planting at each end of the long 12-foot bed and will "train" to grow towards the middle. Plenty of room, and prolific. Another gift to the new owners!
Instead... we're planting as much as we can in 5 gallon pots/containers so we can move them to our new home. We have about 30 pots so this is our plan for them:
- Blueberry (the new one that we bought on Saturday)
- Eggplant
- Eggplant
- Hot pepper
- Hot pepper
- Striata-d-Italia Zucchini
- Striata-d-Italia Zucchini
- Yellow straightneck squash
- Yellow straightneck squash
- Bell Pepper
- Bell Pepper
- Okra
- Okra
- Bunching onions
- Bunching onions
- Wonderberries
- Raspberry
- Raspberry
- Blackberry
- Blackberry
- Blackberry
- Tomato/basil/marigold
- Tomato/basil/marigold
- Tomato/basil/marigold
- Tomato/basil/marigold
- Tomato/basil/marigold
- Tomato/basil/marigold
- The rest will have as many tomatoes as possible. We're growing several varieties - but never enough!
We have other containers that still have plants alive from last year (indoor grow lights / dormancy): (1) asparagus (2) asparagus (3) blueberry (4) banana (5) wonderberries.
Ooops. Guess I got off topic. I love my garden, and as things grow, we'll post regular updates with pictures.
Blog Carnival
Just found out... we made it onto a homestead "blog carnival"!
Vikki Lawrence-Williams presents Growing Turnips posted at Survival Cooking, Gardening and Emergency Preparedness Info, saying, “Here’s a great bit of info on how to grow turnips: including a bit of history, seeding, thinning and more. To post 2 days later is info on preserving turnips.”
Welcome to all visitors who found us from: http://www.mysmallhomestead.com/! Please come back often.
Recipe: Coco-Candies
This is a fairly simple candy to do the next time you get a craving! The only perishable item is the butter - if you substitute butter-flavored crisco or something non-perishable, let us know how it turns out.
Ingredients:
1 pound box 10x sugar (powdered sugar)
1 cup flaked coconut
1/3 cup soft butter (or lactose-equivalent)
1/2 teaspoon salt
1 teaspoon vanilla
1/3 cup light corn syrup
cinnamon and sugar
Directions:
Mix all ingredients (except cinnamon and sugar) together with your clean hands until it clings together, then refrigerate covered for 2 hours. Take out and allow to soften for a few minutes. With clean hands, roll into small balls. Mix together equal parts of cinnamon and sugar. Roll the balls in this mixture. Store in refrigerator when not eating!
Copyright (c) 2009 VP Lawrence-Williams
Living Paycheck to Paycheck.... Or Not.
This economy has hit everyone hard. People losing jobs. Retirement funds going negative. Dow Jones hitting the biggest drop in many a year. Grocery prices soaring. Gas prices back on the rise. Foreclosures and walk-aways happening every day. Even so-called wealthy people are forced to make some changes to their lives.
One of the traps we fall into, when times get rough like now, is living paycheck to paycheck. We might have had to dip into savings. Our stored foods for emergencies are now like a grocery store jackpot. And we can't just switch jobs because there are very few open jobs to go around.
We have to... live paycheck to paycheck.
My hubby works. He works long and hard for a little pittance of a paycheck. He takes over when the manager is gone, but doesn't get any of the perks or a matching title. He does special projects when no one else knows how to code the system, without added benefits. If he were to look for a job now, well, we glanced around and there's nothing anywhere near comparable.
I collect a small amount of disability. Some days I can barely move or remember my name, but I (usually) make myself get out of bed. Son and Hubby need me. As do the puppy, the dog, our garden, and you, our wonderful readers. On days I feel better, I write a few days worth of postings on the probability that I might not want or be able to get online.
We live "paycheck to paycheck". Even though we had savings and stockpilings, hard times hit us like everyone else. We've dipped into everything. So I decided to do a little research, to help us but also for those of you who may be in a similar situation:
- Consider moving into a cheaper living situation (if we can't afford to pay cash for our next homestead, we'll rent or move in with mom-in-law or do something else);
- Take care of your stress (see our earlier posting: "Don't Stress"
- Take responsibility for your situation - whether you got laid off by no fault of your own, it was an act of god or you blew your mind and laid into your boss - it doesn't matter. You need to move forward. Accept that it happened, it's in the past, and now you can look to the future as a bright new adventure.
- Hold yourself responsible for your financial future. Even if you have a partner, each of you take 100% responsibility on your shoulders and leave it there. Consider it a nice little jacket you can wear, and you'll shed a thread here and there as you work to beyond the "paycheck to paycheck" syndrome.
- Take control of the situation. I'm a list person. Here's what I came up with for us:
- More Income: Yard sale. E-Bay. Moving to a smaller place or renting or whatever. Writing more books. Adding to our Amazon store. Using more coupons when shopping.
- Less Spending: Our spending is already pretty limited. We don't have extras like cable. We both have old junky PAID-FOR cars so there's no trading for cheaper cars. I only drive once or twice a week. We combine our errands. Our newspaper subscription is about to run out but we're not renewing. We could use more of our stored foods (including the dehydrated produce from our last year's garden). We WILL reduce eating out to only once or twice a week, and set a limit to how much we can spend per meal (for the three of us, we can do ok on $25 - we need to get that lower). Hmm... still thinking of more.
So far so good? Okay - next few steps:
- Make the decision that you deserve better. You are a wonderful person, with many gifts and talents, and a good spirit. You are on Earth as a human to enjoy the human experience, so doggone-it... enjoy it! You deserve a terrific life, and by-gum, you're gonna go for it! You have the education and experience and know-how to get that dream job, or to start a business of your own or to sell your favorite hobby/crafts. Remind yourself why you're so special and so wonderful. Then remind yourself that you are worth earning good money - better money! - because of your special gifts and talents.
- Here's another opportunity for a list: write down (or journal) this process. Why haven't you earned as much money as you feel your deserve? List all of the excuses, er, reasons. These are just stumbling blocks, nothing more. Limiting beliefs. Are you really convinced that they actually true? Do people who earn more think these things about themselves?
Now... are you ready to change things? To earn what you are worth?
- Ok... imagine yourself earning the money you decided you wanted. Does that allow you more time on your homestead? With your loved ones? Do you see your storage space filling up with ammo and dried foods and toilet paper?
- Start hanging out with people who see you as the valuable person you are. Your new self-image can definitely match other people's image of themselves. If you have a "friend" who tells you you're stupid for even thinking about looking for a new job in this market, or that you should just shut up and stay put, or that you could never make money selling your cinnamon apple trats, drop them like a bad habit. Along the same vein, do you have "friends" who would say horrible things if you suddenly began earning a good hefty amount of money? Would they be so jealous that they would find any little thing to pick on you about? You need positive people around you. The more positive and encouraging, the better.
- Time to get started.... do you have a list yet of what you can do? Carve wooden toys? Grow veggies for sale? Bake homemade bread for a local organic restaurant? Baby-proof a home? Train dogs? Babysit in your home?
- Once you've made your list, affix your pricing structure. Whatever numbers you calculate, add on a bit more (because believing you are valuable might be a little too new to you).
- Start a personal blog, talking about your personal life but DON'T give out too much personal information. You want prospective employers to see the blog and your resume and examples of your work, and KNOW that you're the perfect person for their company. Strong, steady, personable, committed to doing a great job, etc. And you want potential clients (for self-employment) to see you are not a fly-by-night situation, and that you'll deliver as promised. Stay away from facebook, etc. because while those are social networking sites, they are starting to get the wrong subtext going. Be upstanding.
- Are you going to look for a better job? Get help with your resume to update it for today's economy. When you see a want-ad, you need to modify your resume to THAT job, because the person on the receiving end of your resume will be looking for the same key words in your resume that was in their advertisement. Make sure your resume is spell-checked, error-free, and on crisp white resume paper. The cover letter should be well-thought out, again using those same key words that were in the job advertisement, and clean/error-free. The envelope should be the same paper quality as the resume and cover letter, and typed neatly (yes, get out that typewriter if you need to).
- Network: use your blog, your friends, your associates, former colleagues, etc. Build up your network of contacts, and your distribution. Tell everyone your situation (looking for a job as a [fill-in-the-blank] or starting to sell your homemade [fill-in-the-blank]. If you make baskets or candles, you HAVE to market them online! Do you do any kind of training? Make a video and sell it as an immediate (auto-response) download. Word of mouth will help you.
To summarize... we're not saying to quit the job you have because that better one is coming. Please don't. Not in this economy.
We're saying with a little hard work and following the steps above, you will be able to change your life without too much disruption. And it's better than sitting and looking at the computer screen, watching your stocks tank and the corporate giants like AIG get even more bailouts! (sorry, had to get that barb in)
YOU are the only person who can change your life. YOU are the only one who truly knows what you are capable of. YOU are the best person in the world to do what YOU can do. Step it up. Do it.
Besides, NOW is the best time to change your income style because if the S*** ever (!) hits the fan, you will need to have an alternate source of income. Right?
Copyright (c) 2009 VPLW
p.s. Word of mouth would help us too! Please link our website (http://www.survival-cooking.com/) from yours! Thanks.
Recipe: Ramen Noodle Salad
Are you stocking up on Ramen noodles? They are cheap and very easy to prepare -- especially in this salad! Here's a salad you can make with your pantry's givings with a little help from your garden:
Ingredients - Salad:
1 head of lettuce (or 4 cups greens)
6-8 green onions/bunching onions
1 6-ounce can mandarin oranges
1/2 cup dried celery dices (rehydrated)
1/2 cup toasted slivered almonds (toasted)
1 3-ounce package of Ramen noodles, uncooked & crumbled
Ingredients - Dressing:
1/4 cup vegetable oil (or avocado or walnut or olive oil)
3 tablespoons apple cider vinegar
seasoning packet from noodles *
sugar/salt/pepper to taste
Directions:
Chop green onions. Tear lettuce into bite sizes, then wash and spin dry greens. In a large bowl that can be covered, mix together the greens and green onions with the mandarin oranges and rehydrated celery dices. Cover and refrigerate. Blend together dressing (seasoning to taste). Just before serving, add to the salad the dressing, almonds and noodles.
* I use only half of the seasoning packet because it's very high in sodium (bad for my blood pressure).
Copyright (c) 2009 VP Lawrence-Williams
Raising Chickens Inside Your Home
We want fresh eggs but where we live, chickens are illegal. We could have two ducks and one pig, but chickens? Not allowed. Totally doesn't make sense. Go figure!
Anyway, we started thinking. We have heard about people raising quail in their homes, but haven't eaten quail, and we know that quail eggs are very small. So... is it possible to raise a chicken or two inside a home for egg purposes? Would they grow to be neurotic? Prefer indoors as opposed to outdoors? Be quiet enough? Docile enough? Tolerate our cold family room?
So a little research was needed.
This past Monday, I called Murray McMurray Hatchery and spoke with Pat. I asked her the question: have you ever heard of anyone raising a chicken or two inside a house for eggs? Her answer surprised me (I'll paraphrase her answer):
Yes, she has a co-worker in that office who took two chicks home. She set them up on a spare bedroom with a bunny. All cozy in their cages. Just started producing eggs (although for some reason she hasn't eaten any of them yet!). The smell isn't too bad, and when it's sunny, she lets them out for a little air. Changes "bedding" daily.
Murray McMurray Hatchery's contact info is: P.O. Box 458, 191 Closz Drive, Webster City, Iowa 50595, phone: 515.832.3280 or toll free: 800.456.3280 or fax: 515.832.2213.
So... I guess it IS possible.
I wonder...
We could build a couple of nesting boxes in our family room, right next to the sliding glass doors that lead to the fenced-in backyard. Maybe a little ramp to get down to the ground for when we let them into the backyard. Safe from our puppy, but where he and the older chihuahua will get used to them and won't chase them when we get our 2-5 acre homestead. Close to the backyard for cleaning-cage time (daily would be necessary).
I wonder...
If we let them out once a day, when it's nice out, during the day when most neighbors are at work, would the chickens be quiet enough so people won't know they are there?
I wonder...
What kind of chicken could we find locally? Here's a link to breeds: http://www.ithaca.edu/staff/jhenderson/chooks/chooks.html - would need some chickens that are adaptable to confinement, cold hardy, small/miniature size full-grown, quiet, etc.
I like the Ameraucana (also known as the Easter Egg Chicken - lays blue and green eggs), Araucana (lays blue eggs), Cochin (yellowy-brown eggs), New Hampshire Red (light to medium dark brown eggs), Plymouth Rock (light to medium brown eggs), Silkie (light tint), or Sussex (creamy to light brown eggs).
Still...
Would we be able to keep the smell down so we could sell the house? Would they be warm enough in the family room which is quite cold right now? (We keep our house's temp between 55-60 degrees F for financial reasons.)
Still...
We would have to find a local supplier because when you buy chicks from a hatchery, they usually ship in groups upwards of 20 for the babies to have each other for body heat.
Still...
We would have to get a different kind of chicken for when we have the homestead because there they will be free-range foragers.
These are questions we're still pondering. Does anyone have any experience raising chickens in your home? Details, please!
= = = =
As we haven't used any of the following, we can't endorse any, but here are a few links to chick suppliers:
http://www.mcmurrayhatchery.com/
http://www.randallburkey.com/
http://www.lionsgrip.com/producers.html
http://www.mypetchicken.com/default.aspx
great link:
http://www.motherearthnews.com/directories/Hatchery-Directory.aspx?directory=116150
One more thing... I had been thinking about this for a while. Could chickens be raised exclusively in our home? What if we get notice that the bird flu has mutated so it could be passed human to human, and that strain has entered the USA?
So.... if the bird flu does hit, wouldn't it be nice to know that with a little warning, you could set up an area inside your home (garage, basement, family room, or guest bedroom) for your feathered friends, and know you'll be safe from exposure to the bird flu, at least from your own flock? Plus, if you're confined, you'd have fresh eggs daily, which is a great source of protein.
Now... for a sad sidenote:
We have given this a lot of thought over the last week, and even more discussion. With our financial situation the way it is, we're going to put off getting any additional critters to take care of. If we had to suddenly rent an apartment, we'd have a time trying to find one to take our little chihuahua and our giant puppy! But meanwhile, this is good info for later, or to share with you!
Recipe: Easy Black Bean Soup
Keep this recipe near your stored cans! Basically, all you do is combine, heat and serve!
Ingredients:
1 can diced tomatoes, with liquid
1 can white kernel corn (or yellow if you prefer), with liquid
1 can minestrone soup (ready to serve)
1 can mixed vegetables
1 can new potatoes, with liquid
1 can black beans
Directions:
Drain and rinse the black beans. Add all ingredients to medium saucepan and heat to very hot. Serve topped with green can parmesan cheese.
Copyright (c) 2009 VPLW
Building Codes
All the recent posts about alternative housing construction has brought to mind a question: if we want to just start digging a hole and create an "underground" home that no one knows about, would we get in trouble with our county's building code?
Researching our local code says yes, we have to get approval from our city to have anything that is bigger than 10 feet squared and has a roof. Do you know what yours says?
So basically, unless we do it way out in the boonies and camoflauge our construction from satellite and on-ground prying eyes, we have to have permission from the government to do anything on the property that we paid for. That we own.
Doesn't seem very fair, does it?
The purpose of this post is to remind you that before you start building that log cabin, sand-bag dome or digging that underground cave, you need to find out (as quietly and subtlely as you can) what your local government office has to say about it. Chances are, it's a lot.
Another few thoughts:
-do you need "permission" to place a "sheds" (even pre-builts) on your property
-do you need "permission" to place a "barn" on your property
-do you need "permission" to dig a hole for a buried trash can
-do you need "permission" to make an outhouse
Using Stored Foods in Regular Meals, and Rotating
You have started your Survival Binder right? The one where you have your inventory checks, favorite stored-food-recipes, basic first aid, location of certain documents, etc.?
Here's something you can do when your family has a free afternoon. (I can hear the chuckles now!) Sit down around the dinner table and ask the family to tell you their favorite recipes that you make from stored foods. If you haven't prepared any recipes from ONLY stored foods, get cooking. Let everyone in the family choose a favorite recipe for a dinner meal. Turkey chili. Fried corn-loaves and black bean soup. So on.
Should be the main course, fruit, veggie and grain. Maybe even include dessert!
All ingredients for those meals need to be stored foods, cans of fruits/veggies/meats, boxes of pudding mix with powdered milk, etc. Make sure it's well balanced, nutritious, and can be slightly altered for changing tastes.
Your goal is to come up with 7 different dinners, and then 14 different dinners. That will give you 14 days, each with a different dinner.
Then...
-write down what ingredients you need to make each meal
-shop for the ingredients to make each meal
-bag up the ingredients to make that meal and label (a "dinner bag")
-include the recipe with each bag, if necessary
-label the bag with the Dinner Day #
Do this for each of the 14 days. Pack up another 14 days. And another. That's a month and a half of not needing to plan dinner. Each time you use a "dinner bag", write a reminder to purchase those ingredients the next time you go to the grocery. Then do that, repackage it with the recipe again, and do it all over.
This will let each person in the family have their favorite dinner on a regular basis, while making the planning and preparing very easy for the chief cook!
= = = =
Should you really be ambitious, you can do the same thing for breakfast! Grits and powdered eggs with a can of fruit cocktail? Packets of instant oatmeal with dried strawberries and bananas?
You get the drift.
Recipe: Easy Tomato Soup
Tired of yet another can of tomato soup? Here's a way to spruce it up!
Ingredients:
1 can of condensed tomato soup
1 can corn, drained
1 can diced tomatoes, with liquid
dash of hot sauce (optional)
Directions:
Combine all ingredients in a small-to-medium saucepan, add one soup-can of water, and heat to very hot. Serve immediately.
Copyright (c) 2009 VPLW
Ingredients:
1 can of condensed tomato soup
1 can corn, drained
1 can diced tomatoes, with liquid
dash of hot sauce (optional)
Directions:
Combine all ingredients in a small-to-medium saucepan, add one soup-can of water, and heat to very hot. Serve immediately.
Copyright (c) 2009 VPLW
MRE's versus Home Cooked Meals
Some people are stocking up on MRE's (Meals Ready to Eat) which is fine for some people. They are nutritious, last a long time, and very portable. Plus, they are absolutely ready to eat without worrying about cooking. However, I have high blood pressure so I couldn't handle the sodium content of most of them.
There's also the freeze-dried meals from places like Mountain House that are tasty and somewhat nutritious. We love the ice cream bars but just aren't the same thing.
Why stock up MRE's, freeze-dried meals or other no-cook items?
Some in your stockpile is ok. There may be days you don't feel good and just don't want to cook. Or you don't have power. Or you're on the move.
But consider cooking: it takes planning (time), preparing (time), heating (time) then serving and enjoying. If you are confined with very little to do, you may appreciate cooking
Recipe: Preserving Turnips
If you read the posting on March 10 about growing turnips, now you want the info on preserving them.
As you thin the plants, eat the washed thinnings in salads, or steam with onion and served with ham/ham hocks.
A lot of people just prefer the turnip greens, and leave the turnips to rot. Turnips are a good low calorie source of vitamin C and fiber. Turnip greens contain large amounts of vitamin A and especially large amounts of lutein which has been shown to help prevent cataracts and cardiovascular disease.
Eating Fresh:
Greens:
- cook like spinach, serve with vinegar or tobasco sauce
- add to a stir fry at the very last minute
Turnips:
- boil and mash like potatoes
- slice and serve with butter and seasonings to taste. Don't overcook.
- cook in stew or soup
- slice and serve raw VERY YOUNG turnip roots
Preserving - Short Term:
Greens:
- Freeze like spinach
Turnips:
- Store whole roots in refrigerator for a few weeks
- See recipe below for Purple Pickled Turnips
Preserving - Long Term:
Greens:
- Freeze like spinach
Turnips:
- Slice thinly (use a mandolin for same-size slices). Marinate in soy sauce, season to taste, and dehydrate until crispy. This is the recommended way to preserve turnips long-term.
The following recipe is to preserve the turnips short term. After a lot of research, I couldn't find pickled turnips for long-term storage.
Purple Pickled Turnips:
Ingredients:
5 pounds of turnips
1 can sliced beets (keep juice!)
Brine (see below)
1 chili pepper, halved
salt to taste
Directions:
Make brine with 1/3 parts boiled water to 2/3 parts white vinegar, and add salt to taste. Clean turnips and cut in half. Then cut each half into thick slices. Place turnips, beets and beet juice (important!) into a large jar. Cover with brine. Add the chili pepper. Refrigerate until turnips are completely pickled - able to tell if turnip is pink in the middle when cut. May take about a week. Will laste in refrigerator for a few weeks.
Copyright (c) 2009 VPLW
Inventory Check: Baby Wipes
Here's today's reminder to check your inventory of: baby wipes!
Baby wipes are NOT just for the little behinds of babies. They are great for other things, like a quick "sponge bath", washing faces after a messy meal, washing hands before a meal, and so many other things. We even use them to clean our dogs' faces in between baths - especially that eye gunk that discolors their fur.
Think about this: what if something happens and you're unable to take a bath or shower for a couple of days? If you have a couple of boxes of baby wipes, you'll be just fine. One wipe can go a long way.
We buy the Wal-Mart brand "Parents Choice", a box at a time. Each box has about 648 wipes, which is more than enough to last through even several weeks worth of confinement.
There are always two extra boxes in our storage, and one in use. That's for a family of three (plus 2 dogs). Examine your needs.
Recipe: Millet Porridge
When you see the word "porridge", how many people think of...
Pease porridge hot, pease porridge cold,
Pease porridge in the pot, nine days old;
Some like it hot, some like it cold,
Some like it in the pot, nine days old.
Alright... although most people think negatively of porridge, and that it's usually made of oatmeal, here's a millet porridge that's quite easy:
Ingredients:
1 cup millet
3 cups water
dash of salt (to taste)
Directions:
Rinse the millet (use a fine sieve). Place the rinsed millet in a small to medium saucepan, add the water, and heat over medium heat until the millet is soft. Serve with a little honey, grated cheese, raisins and walnuts, etc.
While millet is more expensive that many other grains, it is an essential grain for people who have an intolerance to wheat. It is also important to provide variety.
Consider stocking 1 pound of millet for every 20 pounds of wheat or oats.
Copyright (c) 2009 VPLW
Growing Turnips
I don't care much for turnips but here's a bit of information for your to grow and harvest your own turnips and greens:
Description:
The turnip is a biennial which means it grows in one summer, hides a little during the winter, and flowers the next season. It's usually considered an annual, though.
The leafy stems may get 1-2 feet tall and the root (the actual turnip) could get up to a foot in diameter. (We're using the term "root" lightly as it's not an actual root but a swollen part of the stem).
Americans prefer to grow 'Purple Top White Globe' for the roots and 'Seven Top' for the turnip greens, but there are a plethora of varieties to choose from - it depends on what color and taste you prefer.
History:
The turnip has been "gardened" by humans for a long time - some say more than 4,000 years! North America discovered them in the late 1500's.
How to Grow:
Turnips can grow in almost any soil, if it isn't too hard or too wet, but should be near-neutral PH. They need full sun, and a deep watering once a week (otherwise they could bolt prematurely). Very cold tolerant, and can tolerate frost and moderate freezes (down to around 15 degrees F). These are a cool-weather crop, so plant in very early Spring (now is a good time) or in late Summer to mature in the cool Autumn.
Sow turnip seeds thickly. Cover with about 1/4 inch of soil; water well. Germination may happen in less than a week.
IF growing for roots, thin seedlings to 6 inches apart when they are 3-6 inches tall. Eat the seedlings (wash first!) in salads or steam.
Hardiness:
USDA Zones 3-10.
Grow fast and pick young because as the weather warms, the greens (tops) will get bitter and the roots (turnip) will become stringy and woody. Frost improves the flavor.
Harvest:
Greens are ready to harvest in 5-7 weeks - just take a few leaves from each plant so that it will continue to produce more leaves, and will continue to grow the turnip. Harvest roots in another 2-3 weeks. Note: if growing in the Autumn, can leave the turnip in the ground if it doesn't freezse solid.
Usage:
Eat the little seedlings raw in salads or steam like spinach with onions and served with ham.
We'll be posting how to "put up" turnips soon!
= = = =
Updated March 15 2009: If you found this blog posting through a blog carnival, we hope you'll click here and check out our recent postings, including how to raise chickens indoors, living paycheck to paycheck, how and why we have stored food recipes, and much more!
Fiction Related to Blog's Topic
I found the following as I was searching the net yesterday.... check it out: http://culturechange.org/cms/index2.php?option=com_content&do_pdf=1&id=331 - discusses several "post-apocolyptic-type" books, including Jim Rawles "Patriots". Great review with details about what was lacking or great, in each.
By the way...
Welcome to new readers who have found their way from StumbleUpon.Com and Survivalblog.com and all other blogs and websites who have recently linked to us... thanks for spreading the word and please come back!
By the way...
Welcome to new readers who have found their way from StumbleUpon.Com and Survivalblog.com and all other blogs and websites who have recently linked to us... thanks for spreading the word and please come back!
Survivalism, According to "Medium"
Did anyone else watch "Medium" last night? It started out kinda cool - "Allison" had a dream about a post-apocolyptic world where she was missing and her family were trying to make do. Then, as the show progressed, it appeared that the alleged mission of the show was to make all "survivalists" look like we have bunkers and hidden areas so we can store illegal items and kidnap helpless children. Seemed like that to us.
Attention producers of MEDIUM (like you're really gonna read this blog!):
We people who prepare for the worst and hope for the best...
We people who may build a bunker just in case that worst happens...
We people who store survival supplies (and NOT just backpacks filled with energy bars)...
We are NOT mental cases and criminals. We are sensible people following what we believe is a good path.
Because of YOU...
...people are going to stop preparing because of the new perceived-image brought on by your show. Did you even consult with people who prep? People who build bunkers and store in them with water purification methods, seeds, gardening tools, dehydrated food, books and more like that?
Stop following the money.
Tell the truth.
Recipe: Cornmeal Loaves
Cornmeal is underestimated. Try this for a very cheap and fairly easy method of giving us our daily bread!
Ingredients:
1 cup corn meal (masa doesn't really work well here)
4 cups water
dash of salt (to taste)
Directions:
In a medium to large saucepan, mix the corn meal with the water using a whisk. (A whisk will get out more lumps than a fork). Place the pan on medium heat and keep stirring until it thickens. This stage could be considered porridge and can be eaten with a little honey or cheese melted within.
To eat later, pour the remainder of the "porridge" into a loaf pan and let cool. It will turn solid, which you can later cut into slices. Fry the slices for a tasty treat! Quite filling next to a bowl of lentil soup.
Copyright (c) 2009 VPLW
How & Why We Have Stored Foods Recipes
During any type of confined situation (blizzard, pandemic flu, etc.), having a stash of recipes for stored foods is essential. Have you started a binder, and printed out recipes from here? Have you noted in that binder what foods you need to store and how close you are to that goal? Remember to note the location of these foods too (bin under bed, box behind laundry machine, etc).
I've been thinking a lot about these recipes for stored foods that I've been posting. Basically I take an interesting recipe, and modify it to suit my pantry, my family's diets and taste buds. But I'm thinking I've neglected to explain something.
In 2004, I was homeless. My son and I "lived" in a small popup camper. Son had his bedding, suitcase of clothing, a small box of books and a couple of toys on his side. I had my stuff on my side. We had a fold-up table that we did his schoolwork at, where we ate, where he colored, etc. We had a little room underneath for towels and toiletries, etc. We hooked up some extension cords to the family who generously allowed our camper to park in their front yard for about 2 months. With that electricity, I ran a small refrigerator/cooler that we found at Wal-Mart for about $100 (another friend gave us this cash to do this). The fridge could hold a couple of yogurts, a small mayo, a quart of soymilk, and a few lunchables. Except for those few things, we had no room to store food. We often went to the food bank for whatever they had: usually lots of bread, some rotten fruit, and sometimes milk or yogurt that was on the edge of expired.
I vowed to never be hungry again, and as soon as I could get into a better situation, I did. I bought 4 cans instead of 2. Or an extra measure of powdered milk. I stockpiled, but not for the reasons I do today.
Now, in this last year or so, my new hubby and I and Son have been through some major financial and medical situations recently. Instead of increasing our stores, we've had to dip into them. Severely.
I tell you this to help you understand where we are coming from. Where I'm coming from!
Now... on to using our stored foods to feed our families:
Even if you are on a limited budget, and can't afford anything extra but one food item a week... we hope you're stocking up on lots of whole grains, cans of veggies and fruits, legumes (beans, peas, lentils, peanuts), cooking and baking supplies, and, of course, meat.
As legumes are very cheap and extremely easy to store, you'll grow to depend on beans to be on your plate at least once a day. Your canned meat may be a special treat to have only a couple of times a week. Your staples will be grains and legumes, so I'm working to provide more grain and legume/bean recipes. They will be cheap, have only a few ingredients, filling, and easy to prepare.
Hey - it will help my family too! We have beans and grains stacked around our ears but we've used every tissue in the house in the past five days! (We're all sick.)
Stay tuned - we're working on those new grain and bean recipes!
p.s. if you could help spread the word about our blog, we'd appreciate it.
Urban Homesteading
I just added that little blip above - about urban homesteading. Yes, we prepare for the worst and hope for the best. Yes, we consider ourselves "survivalists", and stockple food, defense items and necessary supplies.
To survive in the face of a hardship means to be self-sufficient. To have the know-how and experience to provide everything possible for ourselves, or to be able to trade for such things.
So we work hard to become self-sufficient. To be homesteaders, even though we don't have a large piece of land. Even we live in a suburb where we aren't allowed chickens or bees. Even though we still spend some of our very hard earned money at the grocery superstore.
Our goal is to be urban homesteaders in a small township, on 2-5 acres. To take care of all of our needs ourselves.
It's a process.
And we're working hard to accomplish our goals.
Just thought I'd FYI ya.
Recipe: Fried Corn and Black Beans
Just discovered this recipe, and with a little tweaking to fit our pantry and taste-buds, it's a keeper!
Ingredients
1 can chicken broth
1/2 cup dried onion dices
1/2 cup dried carrot dices
1/2 cup dried celery dices
1 tablespoon dried garlic granules
1/2 teaspoon dried thyme
1/2 teaspoon dried oregano
1 cup water
1 teaspoon Worcestershire sauce
1 can corn (we like white but yellow is cheaper)
1 can black beans, drained/rinsed
oil/salt/pepper to taste
Directions:
In a large skillet, add chicken broth plus the onion, carrot, celery, and garlic; allow to rehydrate for 15-30 minutes. Add rest of ingredients and turn on heat to medium. Cook until almost all of the liquid is gone and everything is fried and tender. Be sure to stir to avoid sticking. Can be served on top of cooked rice or noodles.
p.s. when I serve something like this, picky eater boy, aka VHTS, always chooses something else, like peanut butter and banana gluten-free sandwich or cashew nuts with a pear. He doesn't like so many ingredients, especially touching. Would rather have plain corn, then separately a few beans. Go figure!
Copyright (c) 2009 VPLW
Inventory Check: Electrical Items
This inventory check is a little different from the reminders to check how much toilet paper or coffee you have stored.
This time...
Make a list of everything in your home that uses electricity. That includes, of course, refrigerator, stove, TV, etc. but also includes those things that depend on rechargeable batteries.
Then, just in case you forgot anything, turn off your power. Warn the whole family ahead of time, of course, but do it for an evening or an entire Saturday.
Call it a drill, like a fire drill or tornado drill. How about calling it a "power drill"!
Decide when, making sure all family members are there. Then, when the time comes, Padlock the fridge. Bring out the sticks for roasting wienies (or vienna sausages) over the fireplace. Prepare a whole meal another way - without your power. Play board games or card games instead of watching TV or doing the Wii. Place tape over light switches. Shut off the phone. If your well is power driven, figure out an alternative. What rooms can be closed off? Where should you place duct tape so nobody will use them? Are there areas where you'll now really notice drafts of cold air? If you do this in the Summer, is it unbearably hot and you don't have access to a basement or cool area?
Do you have battery backup for your smoke detectors and carbon monoxide detectors? If not, why not?
Did you have enough foods and drinks (especially water) to last for your experiment? Did you get bored after the first meal? Did you go directly to meal-preparation before pulling out that board game or book to read? Or talk? How about spending some of your time just talking.
Did you have enough paper products? Toilet paper, paper towels, tissues, plates, etc.
Keep track of what you figure out. Maybe a little journal or scrapbook that all participants can write in about the experiment. Take pictures, too.
What did you figure out about your dependence on electricity? Do you have alternatives to those electrical appliances and needs that you just can't do without?
Update March 11 2009 2:30 pm: When we got home around noon from my physical therapist appointment, our electricity was out. The carbon dioxide detector was beeping even tho it was on battery backup, as was the smoke detector. Poor dog and puppy were going nutso.
And then the VHTS began to panic, especially since I wouldn't let him in the refrigerator. "Why, Mom? I'm Hungry!" "I know, but we've talked about this. When the electricity doesn't work, we can't access the fridge because it will let the cold air out, and the food could spoil." "But what can I eat?" "Find something!" Then, grabbing a snack and a juice, he proceeded to check the whole house - having fits because the clocks weren't working, the microwave wouldn't work, etc.
This little experience taught ME that while our heat is natural gas, our thermostat is controlled by electricity which means it wasn't coming on. The temp in our house was 53 degrees (we keep it between 55 and 60). Just a little brisk indoors!
Obviously we need to revisit our own electrical experiment, and have yet more discussions about living without power. Yep, we can always learn more! Vikki
Recipe: Chicken Bacon Casserole
Yummy hot filling dish! To make it a chicken club casserole, serve topped with fresh diced tomatoes!
Ingredients:
1 can cream of mushroom soup
3 cups cooked rice
1 cup water
2 cups dried chicken dices
1/4 cup dried bell pepper dices
1/4 cup dried onion dices
1 cup cooked bacon pieces (jarred are fine)
salt/pepper to taste
Directions:
Preheat oven to 350 degrees F. In a large bowl, rehydrate chicken, bell pepper and onion with the 1 cup of water. Once mostly rehydrated, add rest of ingredients and mix well. Pour into greased baking dish. Bake uncovered for 40 minutes or until heated through.
Copyright (c) 2009 VPLW
Starting Tomato Seeds
Here are a few pictures that show what we did to start our potted tomato plants yesterday (Mar 6):
 We found the easiest method was peat pellets. Yes, we know that peat is not a renewable source, but until we become much better gardeners (remember that this is only our second year), we'll use what works best.
Note: Just picked up a pack of 25 peat pellets (without the little greenhouse) for $2.00 - at Wal-Mart. Not a bad deal.
So... this first picture is the "Jiffy Greenhouse 72" that we bought at the end of last season. At that time, we didn't know we'd be moving. So, since we can't plant a big garden like last year's, I just took 6 of the pellets from the "greenhouse" and placed them in a dish.
When they have rehydrated as much as they are going to (about 1 inch to 1.5 inches tall), gently take the top and move the netting away from the very top. I just take my two index fingers and pull the netting away from the top. Then I take the same fingers and push in the middle of the sides to fluff-up the peat. This will "un-compact" the peat even further, so when you place in the seed, it won't have to struggle to throw down roots. I tried to take a picture of me doing this but it just didn't come in very clearly.
This third picture shows the six peat pellets that have been rehydrated, and placed in yogurt cups. I'll add a little water to each cup as needed (using a mister is best).
I'm using seeds I got from Baker Heirloom: Amish Paste (new), Big Rainbow (yum - big juicy and orange!), Moneymaker (new), and Orange Banana (new) .
Then I wrote on an index card what seed will be put in each pot. We're only doing 6 tomatoes this year. Probably. Maybe change it later.
I cut the labels and taped to the yogurt cup. Then I placed one or two seeds in each pellet that corresponded with the label. I just barely moved the peat aside, placed the seed(s), then barely covered it over. If you've never seen a tomato seed, you should know that they are very small and need to be fairly close to the surface.
Then I took the pellets-in-yogurt-cups into plastic tubs and covered them to keep the moisture in. Now I'll check on them every day. Usually I check 2 or 3 times a day because I love this part!
 This last picture shows a couple of our tomato pots from last year (2008). Notice that we placed a marigold and basil in each pot to help keep bad little critters/pests away. It worked very well.
NOTE: I can NOT emphasize enough that you need to label your seedlings. And keep those labels with the plants after you transplant them. We didn't do a great job of that last year and half the time, didn't know what tomatoes we were eating! I still can't tell you what tomatoes are in this last picture!
We had the same problem with our squash but that's another story.
Vikki
 We found the easiest method was peat pellets. Yes, we know that peat is not a renewable source, but until we become much better gardeners (remember that this is only our second year), we'll use what works best.
Note: Just picked up a pack of 25 peat pellets (without the little greenhouse) for $2.00 - at Wal-Mart. Not a bad deal.
So... this first picture is the "Jiffy Greenhouse 72" that we bought at the end of last season. At that time, we didn't know we'd be moving. So, since we can't plant a big garden like last year's, I just took 6 of the pellets from the "greenhouse" and placed them in a dish.
 Whatever dish you use to rehydrate the pellets, make sure it is shallow enough for you to manipulate the pellets, and that all pellets fit well. Fill a container (I'm using my kitchen measuring cup) with WARM water. For some reason, cold water doesn't seem to work well. Don't flood the dish. Just pour a little at a time. Keep an eye out. I had to go back and pour some more into the dish twice, and the last time, the pellets barely took any in. The pellets, as they rehydrate, will "puff" up, becoming taller. Discard the unused water.
When they have rehydrated as much as they are going to (about 1 inch to 1.5 inches tall), gently take the top and move the netting away from the very top. I just take my two index fingers and pull the netting away from the top. Then I take the same fingers and push in the middle of the sides to fluff-up the peat. This will "un-compact" the peat even further, so when you place in the seed, it won't have to struggle to throw down roots. I tried to take a picture of me doing this but it just didn't come in very clearly.

This third picture shows the six peat pellets that have been rehydrated, and placed in yogurt cups. I'll add a little water to each cup as needed (using a mister is best).
I'm using seeds I got from Baker Heirloom: Amish Paste (new), Big Rainbow (yum - big juicy and orange!), Moneymaker (new), and Orange Banana (new) .
Then I wrote on an index card what seed will be put in each pot. We're only doing 6 tomatoes this year. Probably. Maybe change it later.
I cut the labels and taped to the yogurt cup. Then I placed one or two seeds in each pellet that corresponded with the label. I just barely moved the peat aside, placed the seed(s), then barely covered it over. If you've never seen a tomato seed, you should know that they are very small and need to be fairly close to the surface.
Then I took the pellets-in-yogurt-cups into plastic tubs and covered them to keep the moisture in. Now I'll check on them every day. Usually I check 2 or 3 times a day because I love this part!
 This last picture shows a couple of our tomato pots from last year (2008). Notice that we placed a marigold and basil in each pot to help keep bad little critters/pests away. It worked very well.
NOTE: I can NOT emphasize enough that you need to label your seedlings. And keep those labels with the plants after you transplant them. We didn't do a great job of that last year and half the time, didn't know what tomatoes we were eating! I still can't tell you what tomatoes are in this last picture!
We had the same problem with our squash but that's another story.
Vikki
Subscribe to:
Posts (Atom)